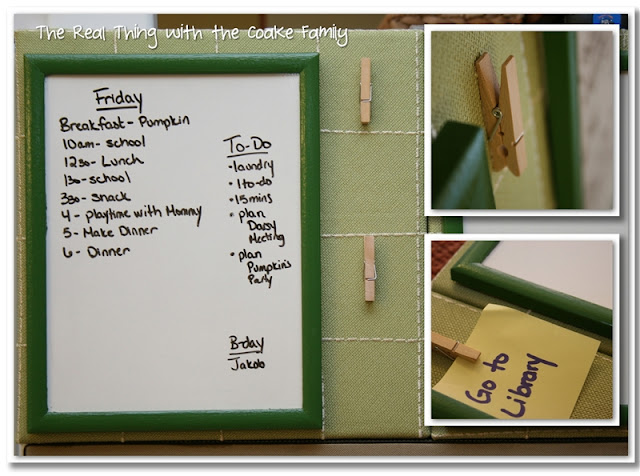
Today, I have the finished top portion of my Command Central for you. This is the adult portion of our Command Central. It is the part Mr. T and I use to keep track of things. He uses his for a running to-do list. I change mine daily with the schedule for the day for the kids as well as my to-do list for the day.
The goal with the command central was to simplify our chaotic refrigerator and make things easier to see and follow through with. Mr. T and I have both used a dry erase board on the refrigerator for this purpose for almost 3 years now. It works well, so we wanted to continue to use them. I wanted them to be in my command central so everything was in one place and it all looked good together. Let me show you how I made this portion and a few details of their use.
I showed you last week how I covered the artist canvas with fabric. After I did that, I needed to paint the dry erase boards I found. I found them at the Target Dollar Spot. $1 each, can’t beat that! They were close to the color I wanted, but not quite what I needed to blend well with the other colors I already had going. I just painted them to a color that would work.
To Paint and Seal the Boards:
- Tape off the dry erase surface so you don’t accidentally get paint on it.
- Sand the surface to be painted. This will remove the protective coating so the paint will stick
- Paint and seal. I used Mod Podge Satin
 to seal it, read below for why I did that.
One note on the painting and sealing. I used acrylic paint for these boards. I know that spray paint is an option that a lot of people would use for this. I am opposed to spray paint as it is one of the worst things you can use environmentally speaking. I try to find other alternatives rather than add more of those horrible chemicals into the earth and into my lungs.
I did want to seal the paint so it would hopefully not chip and would last longer. The majority of sealants for this type of project are in an aerosol/spray paint form. I didn’t want to use those. I asked around and kept getting the answer that Mod Podge can work to seal things. Shockingly, I have never worked with Mod Podge before (::collective gasp::). It was easy to use and has worked really well. I think, so far, it seems like a great alternative to using a spray type sealant. I used 3 coats of Mod Podge and followed the directions on the bottle as far as time between coats.
This project seemed to be one of finding creative solutions to get the desired results. Above, you can see another instance of that in action. I used the artist canvas for this project so I could get sizes that would all work together and not cost me a fortune. They work great, but I needed an area in which to put a few clothespins for notes or invitations, etc. The artist canvas needed a bit of reinforcing in that area so it wouldn’t be stretched out after a bit of use. The solution I came up with, that is working really well, was to cut cardboard and slip it into place in the area that needed reinforcement. You can see above, how I got the piece into place by putting it in at an angle then straightening it into place. It works really well.
Next, up was figuring out how to adhere the boards to the fabric covered canvas. I wanted it to be changeable. I wanted to be able to put up new boards if I want to change the color or if these boards begin to look poorly, etc. I decided to go with Command Adhesive picture hangers . I had them on hand already as we used them to attach the Kid’s Command Central to the refrigerator. The ones we had on hand were too big, so I just cut them in half and used one per board.
It works great and I love knowing I can change them any time I want.
Just like with the Kid’s Command Central, I wanted the 2 canvas’ to be connected together. I feel like it will keep the simple polished look and not allow things to wander on the fridge. Mr. T’s jean shorts got cut up and stapled to the center to hold the two boards together. So far, it has been working really well for both the Kid’s boards and our boards.
All done! The finished product. Pictured above, is how I usually use my board. I write out our daily schedule along with my to-do list for the day. I also keep track of upcoming birthday’s so I know who I need to make a card for or who’s card needs to go in the mail. As I complete items from the to-do section, I cross them off and smile!
The little pink envelope, I made with my Cricut , holds all the rewards and consequences magnets I printed on magnetic paper. I talked about those in my Kid’s Command Central – Parenting Battle-plan post, if you want to read about them. Above, I’m also showing you what the boards usually look like, just keeping it real, instead of only showing the nice polished ones for the pictures.
One step at a time, we are getting there. You can see our old refrigerator (read about it’s demise in this post) in picture #1 and how chaotic it looked. Picture #2 is our new refrigerator with everything on one side…dreaming/planning how to put this together. #3 is with the Kid’s Command Central completed. Now in picture #4 we are up to the Kid’s and Adult Command Central being completed. Yay!!
Next week I will start showing you the middle section. It will contain our calendar and our meal planning. I’ve got it almost done. If I can get it done before next week’s post, I will post the finished project. If not, I can at least show you one component of how I made it. I will have a post somewhere in all of this with a printable for you (once I get it made for me) of the menu planning portion.
Please stay tuned…we are almost there to the big reveal. I can’t wait! You can see from the calendar, I started thinking about this whole thing in April. It will be so nice to have it completed. I just needed to take my time with it, so I got what I wanted/needed.
Read more posts in my Command Central Series:


Oh I need to do this, my fridge is a wreck! I see so many for kids I love the idea of an adult one 🙂
Thanks! It is really handy to have a part that is just for us grown-ups.
I love your command center. Thanks so much for stopping by and leaving me a sweet comment about the Up-cycled Fabric Rosette Tree. I am hoping to make one for each season and maybe even display them all together. We’ll see when I get to that project, haha. Have a great weekend!
Blessings,
Nici
Thanks so much and your welcome, I really liked your rosette tree. It is so pretty! I hope you have a great weekend as well.
I really need to make some sort of command central for us! This one looks great!
Thank you so much! I have found it really helpful and it looks so much better than my hodge podge before this.
Much better! Being organized makes everything better! This is very cool.
I couldn’t agree more. Being organized helps me stay sane and less stressed for sure! Thanks so much for your sweet comments.
It’s all coming together so nicely, the separate whiteboards for both adults is a great idea. Looking forward to the next installment.
Stacey-Lee 😀
Thank you! Those boards work out really well for us. Tune in Friday for the next installment…I’m getting really close to being done.
I love what you’ve done so far and look forward to the final reveal! I’m working on a command centre too… I know what you mean about it taking time… want to make sure it’s going to work for our family! Stopping by from Uncommonly Yours party.
Thank you! Hopefully the final reveal will be soon. I’m glad to know I’m not the only one taking my sweet time. Truth be told, I’d be taking longer except I started blogging about it and now I need to finish it so I can reveal it. That is a good thing. Thanks for stopping by!
Yay for organization! LOL! Great job with this! It turned out perfect! I would LOVE if you would share this at my Crazy Cute Party happening right now! I’ve got a totally awesome giveaway that you could win just for linking up! Come on over! ;D
Between U & Me
Oh! And I’m your newest follower!
Thanks so much! I’m working on it…almost done! yay!
wow, that is so impressive! I love the canvas. I seem to have a “scattered” personality, and I found, finally, two years ago that the only schedule I can follow is a list that I erase as I go- like what you are doing. I don’t have a cool command area though, just a chalkboard wall. I like your set-up, so neat looking!
Thank you! I can definitely get scattered as well. I seem to usually have at least 5 projects going at the same time. Sounds like your chalkboard wall works well for you.
This is fabulous! Thanks for sharing at It’s Overflowing Party!!! XO, Aimee
Thanks, Aimee! Thanks for the great link party!
So exciting to see how it’s coming along. Thank you for sharing at MightyCrafty Mondays!
Thanks so much!