
I love decorating my home and having cute and pretty things around.
Lately, with how busy my 2 teen daughters are, I haven’t had as much time to craft or decorate. I’m also a little tired of how much STUFF I have for each holiday. I have so many boxes in the attic. I’ve been trying to simplify and reduce the amount of stuff and the amount of time it takes for me to change out my decor for each holiday or season.
That way, I can still have fun changing things and seeing something new. At the same time, I don’t have 15 boxes of stuff in the attic, and it doesn’t take me days to change things from one season or holiday to another.
To that end, I’ve been making pillow covers for these pillows I made from an IKEA hack I did years ago. The pillow covers mean that I can have cute pillows on the couch year round that match the colors in my living room AND they also go with the holiday or season. Then when it is time to put the decor away, they take up virtually no space at all. Speaking of storing your holiday decor, to keep it all organized and know exactly what you have and where it is, try this storage organization system. It’s what I use. It’s cute, and I know exactly what boxes to grab when I’m up in the dark attic. It makes it easy and fast.
DIY Christmas Pillows
Supplies:
- Fabric – 3 coordinating fabrics
- Scissors
- Cutting wheel and mat(optional) – affiliate link
- Heat n Bond Lite or Heat N Bond Ultra Hold(affiliate links)
- Iron (affiliate link)
- Cricut(affiliate link)
- Pins
- Sewing machine(affiliate link)
- Thread
- 4 tassels (optional)

Before we get started, at the bottom of this post, you’ll find a printable version of these directions. It has checkboxes for each step. That way, you can remember what you’ve done when you get interrupted working on these DIY Christmas pillows.
Step 1: Design your applique
TIME: 5 – 15 minutes
You may not need the 5-15 minutes to design your applique because I have the Cricut cut files for you at the bottom of this post. Use them if you like the appliques I used. The designs will cost you less than $3 in Cricut Design Space.
Step 2: Cut fabric & Heat n Bond
TIME: 15-20 minutes
You’ll need to decide if you want your applique to be no-sew or if you want to sew your applique to the pillow. If you want the no-sew applique, use the Heat N Bond Ultra Hold(affiliate link). If you prefer the look of sewing the applique, use the Heat n Bond Lite (affiliate link).
I found out the hard way, when I made the Halloween pillows and Thanksgiving Pillows, that the Heat n Bond Lite isn’t strong enough to be no-sew. I had to go back and sew the appliques on my pillows….exactly what I’d been trying to avoid. ?
If you need to know how to make pillow covers, check out my tutorial on how to make the simple envelope style pillows. That shows you how to cut the fabric for your pillows as well as how to sew the covers.
Step 3: Iron Heat n Bond
TIME: 5 minutes

Put the plastic-y side of the Heat n Bond to the back or wrong side of your fabric. You’ll place the iron on the paper side of the Heat n Bond and follow the directions on the package for how long to heat things up.
Step 4: Cut applique
TIME: 10 – 15 minutes

Now you’ll let the Cricut(affiliate link) do the work for you and let it cut out your design. I have a whole post on cutting fabric with the Cricut. The new Cricut maker makes it super easy, but if you have an older Cricut, you can still cut fabric. Take a look at that post for the settings to use.
Make sure you remove the paper backing from the Heat n Bond before you place that side(the Heat n Bond side) onto the Cricut mat. If you don’t, it’ll take you a long time to remove the paper from the mat….not that I’ve made that mistake a time or two or anything.
Step 5: Iron 1/2″ seam into back panels
TIME: 5 minutes

Iron a 1/2″ seam into one side of each of your back panels.
TIP: If you have patterned fabric, try to match up the patterns as best you can in this step.
Step 6: Iron applique
TIME: 10 minutes
While you have your iron hot, you’ll want to get the front panel of your pillow and iron on your applique.
Step 7: Pin and sew back panels
TIME: 10 -15 minutes
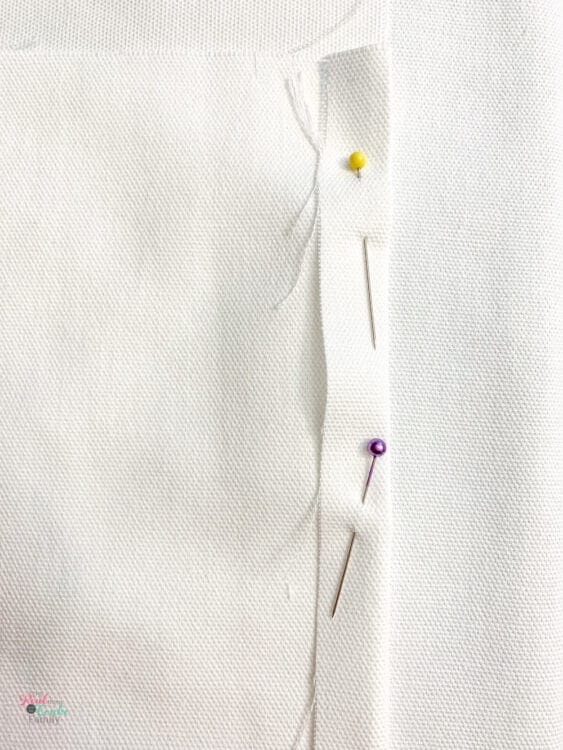
Now the 1/2″ hem you ironed into both of your back panels needs to be sewn.
This is where you’ll shove the pillow into the cover, so you’ll want a sturdy hem here.
Step 8: Sew applique (optional)
TIME: 30 minutes

If you used the Heat n Bond Ultra, you don’t need to sew your applique.
I had cut these out when I cut out the Halloween pillows and Thanksgiving Pillows, so I had used Heat n Bond Lite and had to sew my appliques.

The appliques I used needed a lot of patience and time because of how detailed they were. If that doesn’t appeal to you, either pick a basic applique or use the Heat n Bond Ultra.

In the end, I’m glad I sewed the appliques because the detail looks nice, and I love the gold thread on these pillows!
Step 9: Pin panels and tassels together
TIME: 10 minutes

If you’re using a tassel on your pillows, place the tassel on the right side of your front panel, right up in the corner.

Then use pins to hold the tassel in place.
I found it best to pin the tassel both where I would be sewing it as well as on each side of the tassel to hold it in place. That kept it from slipping around while I was sewing.

Then, pin your panels together. Make sure the patterned or right sides are facing each other.
You’ll want your back panels overlapping like the picture above.

The pillow should look like this when you’re done pinning with the tassels pinned in the corners, as I showed you above if you are using tassels.
Step 10: Sew
TIME: 10 minutes

Sew a 1/2″ seam all the way around your pillows.
Backstitch where the back panels overlap to give extra strength there.
If you are adding tassels, sew over the tassel string multiple times to give it extra strength…at least if your house is like mine and your kids are rough on things. ? ?
Step 11: Clip corners
TIME: 2 minutes

To cut some of the bulk, clip the corners of your pillows. Be careful not to clip your seam.
If your pillow has tassels, you’ll be clipping a part of the tassel when you clip the seams. That’s fine as long as you sewed over the tassel strings.
Step 12: Iron seams
TIME: 10 minutes

To get the pillow ready to turn, iron the seams open.
I cheat by ironing only one seam flat, as you can see above. It makes it faster and still works fine, IMO.
Step 13: Turn and iron
TIME: 10 minutes

Turn your Christmas pillows right side or decoration side out. Iron the covers being careful at the edges to iron the seams flat and not bunched or overlapping.

TIP: Use the tip of your scissors or the end of a pencil to get into the corners and get that fabric all the way out before you iron.
? I adored these tassels! So pretty and match the gold thread and gold polka dots perfectly!

There you have it! You now have adorable DIY Christmas pillows!
The best part is that when Christmas is over, you slip these off and slip on the next season’s pillow covers, and you’re good to go.
I love that they’re personalized to my decor and color palette and that they take up so little space to store for next year. Oh… and that they’re so cute! ?
Sign in below to get your printable craft checklist, and Cricut cut files. After you sign in, wait a minute, and the graphic will change. Then you’ll get your printable and cut file right here, not via email.

When you’re done, don’t forget to tag me on Instagram or DM me pics of your pillows. I’d love to see them!
Thanks so much for sharing with us I’ll be featuring you when the next To grandma’s house we go party starts! Merry Xmas!
Thanks! Hope your holidays were great!
Happy belated Christmas and a Happy New Year to you, KC, and your family! Thank you for sharing this super easy pillow slip tutorial at Share Your Style #236 a couple of weeks ago. I took a break last week but am sharing today, New Year’s Day, at SYS #237. Thanks again for a pretty post! Definitely saving to use with my Cricut for next year. <3
New Year's hugs,
Barb 🙂
Thanks so much! Hope your year is off to a good start!
Using pillow covers is a great idea. I have Christmas pillows and they do take up a lot of space in the storage boxes. Thanks for sharing an adorable project at #HomeMattersParty