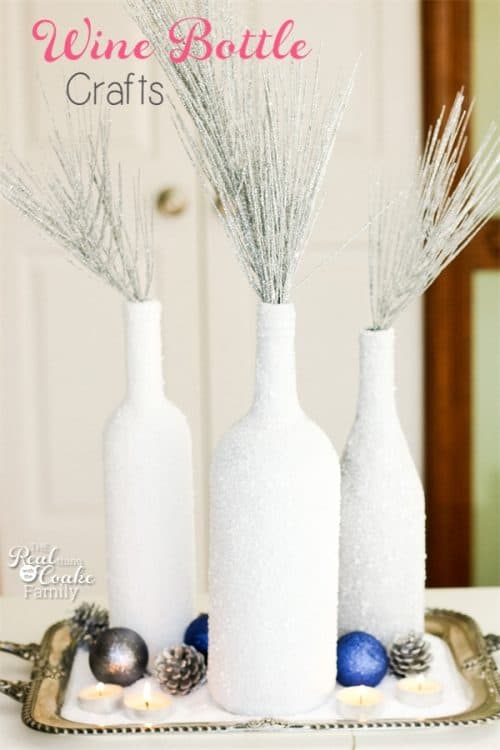
Today, I’m back with an easy and beautiful wine bottle craft for you. You may have seen my post about the Winter Centerpiece I made from wine bottles and Epsom salt, if you haven’t you can click over and take a look. It’s OK, I’ll wait here for you. 🙂 In this post I’m going to show you how to put it together.
I got the inspiration for this project from, Cleverly Inspired: Wine Bottles= Christmas Display. I made my wine bottles very similar to her tutorial. I did change a few small things in my effort to try to make crafts and be the most environmentally friendly I can figure out how to be and/or have the resources to be.

Supplies:
- Empty wine bottles
 (affiliate link)
 - Paint (I used whatever I had on hand)
- Epsom Salt(affiliate ink)
- Mod Podge(affiliate link)
- Paint brush
You will need to start with empty wine bottles with all the labels and such removed. I used 3 different shapes and sizes because that is what I like, but you could use the same size and shape if that is your preference.
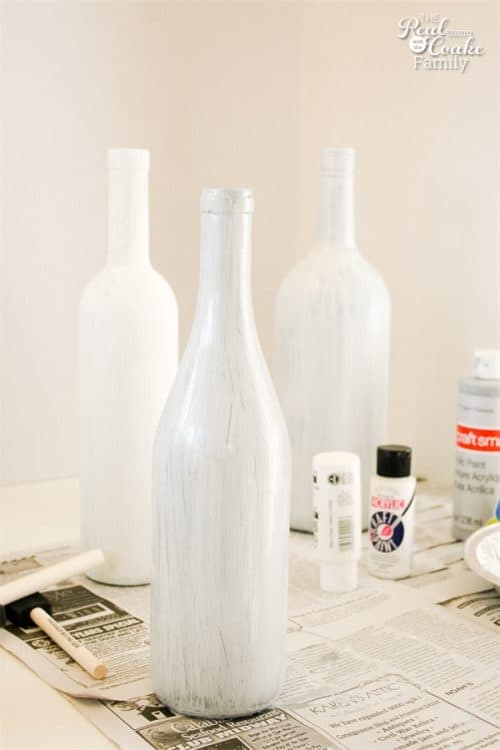
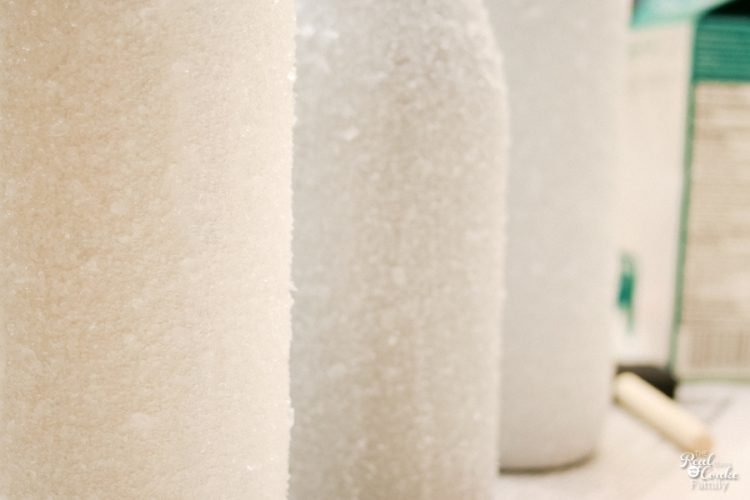
Paint your bottles. This pictures shows only one coat of paint. I used 2 colors of paint to achieve 3 slightly different color bottles. I used a white paint and a silver paint. I painted one bottle white, one silver and one a mix of the two colors.
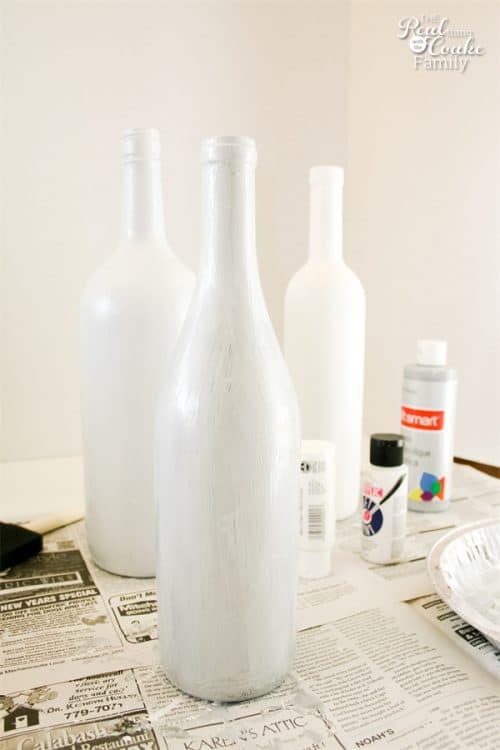
After two coats of paint there will be less streaking. If your paint is like mine, it will be very easy to peel off…or maybe that is because I was impatient and didn’t wait the full drying time and such and so on.
I was a little nervous to try the silver paint, but it turns out it is my favorite bottle and I kind of wish I had painted them all silver. With the Epsom salt on it, it makes the bottle look like sparkly jewels and makes the white of the Epsom salt pop even more. It just seems to sparkle more than the solid white bottle.
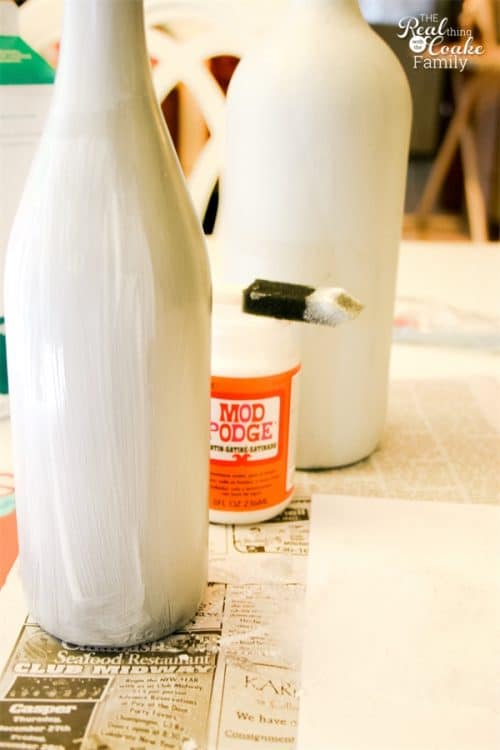
I didn’t want to use the spray adhesive that was used on the Cleverly Inspired site. I don’t like aerosols, they are just so bad for the environment. I decided to try Mod Podge. It worked perfectly. Paint the Mod Podge onto your bottle. Have your Epsom salt ready. I poured mine out on the white piece of paper you can see a little of in the picture above. Roll your bottles in the Epsom salt to cover completely.
Using this method you won’t be able to cover the necks of the bottles. I then covered the tops with Mod Podge and took them to the sink. It was messy, but I really wanted the whole bottle covered. So, I poured Epsom salt onto the bottle necks to get them covered. I first tried doing this at the table…please learn from me and pour at the sink. Unless you like crunching around on salt for days and such.
Let the bottles dry and they are done. So easy and so pretty!
If you saw my Winter Centerpiece post, then you know what I did with these bottles. For those who haven’t seen it, below is a sneak peak. Then I want to show you how I did one more part of this centerpiece.
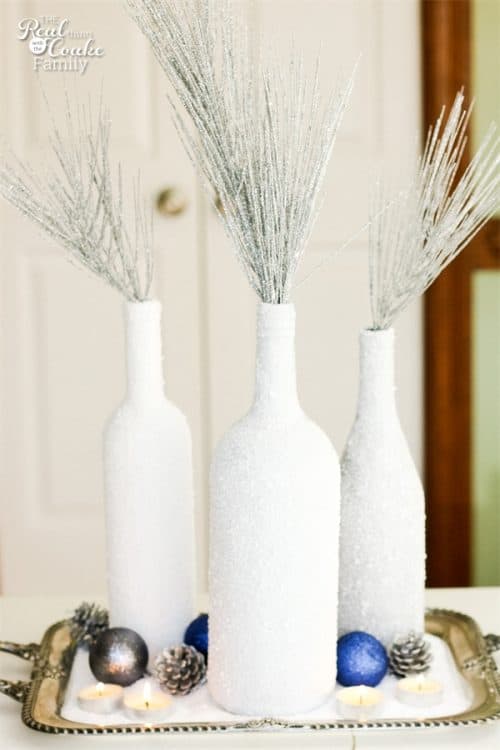
Do you see those three branches? I picked up 1 sparkly branch(affiliate link) on clearance after Christmas for $3. Which made this centerpiece super cheap! I (well Mr. T) cut it into 3 branches.
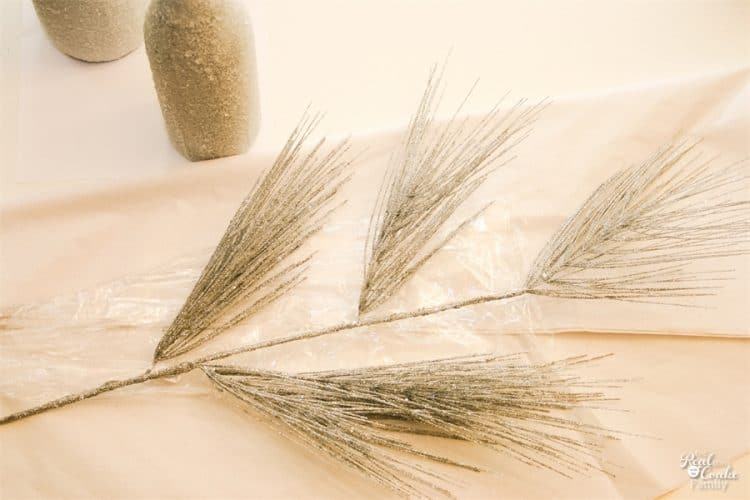
You will want to cut your branch below the top two pieces and separating the other two portions into their own branch, so that you end up with 3 different sections.
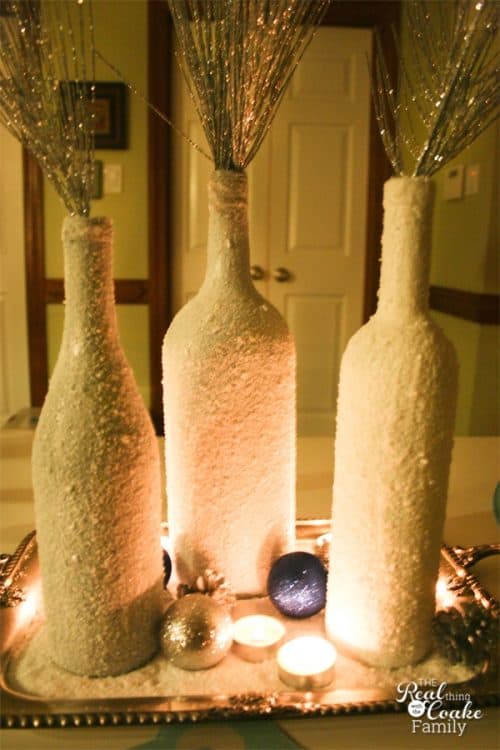
When you are all done, you will have a beautiful centerpiece that was easy and inexpensive to create! Love that combination! Of course, there are so many other ideas of what you could do with these bottles. I have a feeling they may be on my mantel next winter.
Follow me on Facebook or Instagram to see even more fun crafts and ideas.
Awesome project and tutorial! I saw a metallic spray paint on My Craft Channel the other day. I bet that would work great for this project also.
Thanks so much. I’m sure the metallic spray paint would work. I try not to use spray paints as they are bad for the environment. That is why I go for regular paints.
KC
Hopping over from I Heart Nap Time!
LOVE these! So pretty!
Nancy
Thanks!
KC
Love the use of mod podge instead of spray adhesive, so messy…your bottles are so icy and pretty, so many uses..I am a new follower of yours, come on over for a visit,
Thanks so much! Yes, it does seem to me the spray adhesive would be really messy.
Take care,
KC
Love the use of mod podge instead of spray adhesive, so messy…your bottles are so icy and pretty, so many uses..I am a new follower of yours, come on over for a visit,
Oh I love these, so sparkly!!!
Thanks for linking up.
XO
Kristin
Thanks! I love the sparkle as well…they are fun to look at everyday. Thanks for the link party!
KC
Love how the salt looks like ice or snow on the bottles – very pretty!
I love that, too! It sure looks wintry on our table.
KC
Very pretty! I’m visiting from Tip Junkie.
Thanks!
Hi There, I am visiting from Pink Cricut and just wanted to say thank you for the comment about my card! So nice of you! I’m so happy I stopped by this is a fabulous tutorial and I would love to try it! I am a new follower too 🙂
Thanks and have a SUPER day!
Shelly
You are most welcome! Your card is absolutely gorgeous! How did you get the texture on the two sides with the smooth in the middle? I just got a cuttlebug for Christmas. Haven’t really used it much yet, but I am guessing that maybe you did two passes with something like that and left the middle open…anyway, thanks so much for stopping by!
KC
What an interesting idea! I usually have some empty wine bottles available {ahem…} and would love to find a crafty way to use them! Cute! Visiting from Wow us Wednesdays
Jenna
I usually have empty wine bottles as well…it is nice to find a use for them. Thanks for stopping by.
KC
Now I have a project to do with the used bottles I am collecting! We have been saving bottles to reuse for wine we made (see my blog) and now I am stuck on saving bottles…with no use for them…yet.
Do you have other ways of using the bottles??
Nancy
https://wildoakdesigns.blogspot.com
Glad I could help give you a project for your wine bottles. I have a couple of ideas for making a light with a wine bottle on one of my pinterest boards. https://pinterest.com/kccoake/crafts-misc/ I’m sure if you search there are lots more ideas as well.
Enjoy!
KC
stopping in from clean and scentsible. I really love this- does the epsom come off at all?? Wondering how awesome these would be with lights INSIDE. I am a huge fan of the bottle light. newly following you 🙂 I’d love if you’d come by and check out my blog!
The Epsom salt hasn’t come off. I’ve been careful to not have the kids touch it. I have wondered if I will be able to store them for next year or if it will have come off. I think it would look fantastic with lights inside.
Take care,
KC
Sooo cute!
Will certainly give this a try!
Thanks for sharing!!!!!
Thanks!
KC
I love this! I have a few wine bottles from the holidays that i was going to return to the liquor store but i guess ill keep a couple now! Maybe do something similar for spring. Thanks!
Perfect! Now you have something fun to do with them. I would love to see what you do for spring.
Take care,
KC
These turned out beautifully! They look magical. Makes me want to use my leftover epsom salts from my winter mason jar lanterns on THIS project. Thanks for your sweet comment on my blog today. So glad I got to pop on over and check out your lovely blog. Life isn’t magazine-glossy-perfect, so I’m relieved that your blog isn’t! 😉
Thank you! That is so sweet of you to say. I bet the Epsom salt would work great left over from your lanterns. Yes, you are right, life is not magazine glossy and I appreciate you noticing that on my blog and stopping by.
KC
I’ve been wanting to do something with the 50 wine bottles I have sitting around. This is really cute.
I’m having a TWITTER Social hop. I’d love for you to hop on over, grab a button and link up your Twitter. If you don’t have Twitter it’s ok, come link up your blog or favorite post.
https://mydailyphotojourney.blogspot.com/2013/01/twitter-social-hop.html
I’m also looking for Pinterest Pinners to feature every week. If you are on Pinterest and are interested in being featured come link up! Who knows you might meet some other great pinners and gain a few great ideas.
https://mydailyphotojourney.blogspot.com/2012/12/looking-for-pinners.html
Thanks so much! You could have a beautiful winter forest with 50 wine bottles!
Take care,
KC
Do you think these could be outside in the winter. Knave 12 blue bottles on a bottle tree that I take in in the winter sothey don’t. break. These would look really amazing on the tree. in the WINTER!!!
I’m really not sure. I think it depends on how cold it gets where you love. I think you are right, they would look amazing on the tree outside during winter. I think you could always try one and see if it works/lasts. My guess is that it won’t work well out in the elements, but you never know.
Take care,
KC
I did several bottles with this technique and yes, the Epsom salt does come off. Makes a huge mess. You can also use the fake snow in a bag that is used to go around model train displays or that goes on the tree. It works even better and the snow is iridescent to begin with so they really shine nice once you put the lights inside.
You know that is interesting that you say it fell off of yours. I just pulled mine out of the storage box they were in. I had put them in bubble wrap. The epsom salt is still on and looking good. Some came off, but not too bad. Maybe try to store yours in bubble wrap next time…hopefully it will work. I do like your idea of the fake snow, but our cat would probably try to eat it, so that isn’t an option for us.
Thanks for your feedback.
KC
So pretty sparkly. Love some sparkly after holidays when decorations put away, things seem kind of blah to me. I’ve noticed that some epsom salts are sparkly. I bought 2 containers at Family $ and used it all in several ways. I bought some flakey faux snow at thrift store and mixed it in with epsom salts, looks so sparkly and pretty, love it, especially in candle light.
Your bottles are gorgeous, would love to do this, could use them for other decorations, we don’t drink wine so will have to look for other bottles. Love your blog. Happy days
Great tutorials for doing win bottle DIY
Thanks!
If you have a recycling center near you, you can get all the free bottles you want. We don’t drink either so, that’s how I get some of my bottles. You can also ask restaurants and bars if they will save them for you. Just make sure you pick them up the day before the garbage truck comes.
Is it possible to dye the epson salts? These are absolutely beautiful!
Thank you and It totally is! And it is fun! I’ve got a post on how to dye Epsom salts (https://realcreativerealorganized.com/how-to-dye-epsom-salts-and-diy-light-jars/). You can do any color you like. I totally think these wine bottles would be so pretty in other colors.