This is a sponsored post written by me on behalf of FrogTape®. All opinions are 100% mine.
Do you ever have those projects that you know you want to do, but you avoid them for a LONG time? Then you do them and they really weren’t as bad as you made them out to be in your mind? AND on top of that, you love the results and wonder why on earth you waited so long to tackle the project? Yeah…me either. ?

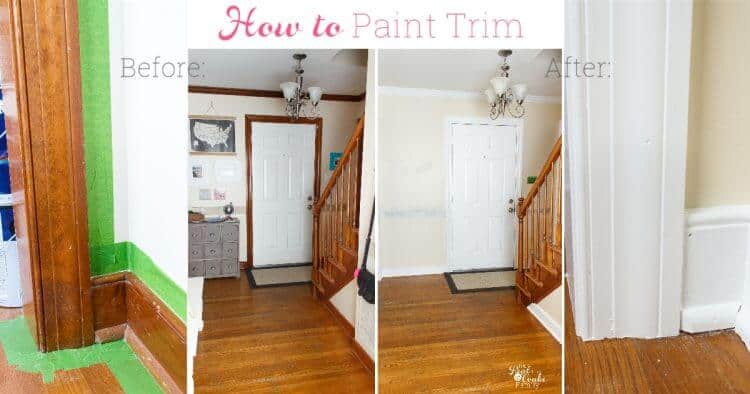
Learning how to paint trim is a skill set that can help you a ton around your house. It truly is an easy way to update your house, just look at that before and after above! My entry hallway looked so dated and now with the white trim, even with the walls not painted yet, it looks so much more fresh, clean and modern.
I feel like at this point in my life, I should be a painting professional because I have painted literally almost every surface in my house and yet, I’ve held off on painting the trim because it felt like too big of a project and such a pain.
When you know how to paint trim, it really isn’t as bad as it seems like it would be.
I’ve tried tons of different methods for painting trim and today I’m going to share my favorite method that gets me clean lines every time and results that stand up to kids and dogs.
How to Paint Trim
Supplies:
- FrogTape®
- Paintbrush
- Primer
- Satin Paint
- Drop Cloths

Before we get to the meat of how to paint trim, let me start by showing you what my entry hallway looked like before.

Back in the spring, I took down the chair rail with grand plans to finish this room and the dining room, which we use as an office. I got the office done, but then summer and our road trip and such and so on and the hallway just sat there looking really bad. 
For me, this project involved more than just painting the trim. I needed to fill in holes and nail marks, etc from where the chair rail had been and all of that needed to happen before I started painting the trim. If you need to know how to take down chair rail, I’ve got 2 posts about that and you can start there with part 1 and part 2(though I’ve learned some new things I will post about soon that help part 2 go even better).
Step 1: Clean Trim

If you are starting your project with painting trim or that is your full project, the first thing you want to do is take a damp cloth and wipe all of your trim clean.
You will want to do this no matter what so that you are starting with a clean surface. You especially need to do this if you have done any other prep work, such as sanding or filling holes. etc.
Step 2: Prepare Your Trim

You will want to prepare your trim for paint by taping it off.
I know there are 2 schools of thought and that one of them is that tape is a pain and takes too long. I hear you. I’ve literally tried every tape on the market and you are right about it taking longer and being a pain….however, that is not the case with Frog Tape®. Yes, they are sponsoring this post and I’m so happy they are because this is my go-to tape for EVERY paint project I tackle around our house.
I’ve tried other tapes that have not come off or have ripped to shreds as I try to take them off. Trust me, Frog Tape® is the way to go.
Yes, it will take you a little extra prep time, but you won’t have to worry about paint ending up on your floor or walls or other places you don’t want it to go.
I also find that taping allows me to be more generous with the paint because I’m not worried about keeping a steady hand at the edges. That means I need fewer coats and that always makes me happy as well as saves time in the long run.

If you are painting your wall, you don’t technically HAVE to tape off the top part of your trim, but I think you do if you have smooth walls.
You will also want to tape off your floors. Floors are expensive, so protecting them any way you can is always a good thing.
You can tape off the floors whether you have carpet, hardwood, or tile. Any will work.
I’ve lived multiple places across the country and where we currently live they don’t add any texture to the walls. It means that any flaw in the wall will show and I think you can see the lines of paint as well if you paint the trim and don’t tape off. Probably a mix of truth and my being picky, so I tape the top off even if I’m going to paint the walls.

If you have trim that has curves, I find that I get the best coverage by using small bits of tape to hit all the angles.
You do need to be careful that you get the full floor covered in these areas.
Step 3: Prime

Don’t skip this step! It may be tempting, but it will lead to a much better end result.
You only need 1 coat of primer and it will look splotchy and like it did no good, but it does.
PRO TIP: Make sure to cover your floors with drop cloths because you never know when you will have drips. I also like to keep a damp cloth handy because if drips of paint get where you don’t want them, you can just wipe them away with the damp cloth.
My sweet Daisy was ready to help me prime. ?❤

I’ve read that you need to sand your trim as well, if like mine it has a stain and a slight sheen to it.
I’ve painted the trim from this state in other rooms and not bothered with sanding and just primed. It has held up just fine in 90% of the places…the 10% that hasn’t held up has been things like the kids threw something and it hit the trim directly and took off the paint. That was going to happen either way.
In my home, priming and not sanding has worked just fine. That being said, I did just paint with no primer once and that did not hold up. So, I highly recommend that you prime.
Step 4: Paint

Paint your trim with your selected paint sheen and color.
You will need to paint at least 2 coats and sometimes 3 is needed.
Keep painting coats until the paint looks even and has good coverage.

The last 2 rooms where I’ve painted trim, I’ve used a Satin paint. I know traditionally a semi-gloss or high gloss is used. I didn’t want that much sheen.
The Satin paint still cleans up well and has held up well to daily life in a house with 2 kids, 2 dogs, and a cat.
Step 5: Remove Tape

When you are done painting, remove the tape. Don’t wait for the paint to dry.
Now of course, if your kids need you or life happens, it isn’t catastrophic if you don’t remove the paint as soon as your done. I’ve just found that I get better results when I remove it as soon as I’m done painting.
Step 6: Enjoy!

I mean! Look at those amazing lines! Even around the curved trim.

I could literally NEVER do this well without tape. Specifically, Frog Tape® because I’ve had some nightmare experiences with other tapes, but Frog Tape® has PaintBlock® Technology that means you are going to get clean lines every time 
You can see a video tutorial on this process playing on the right hand side of your screen.
Oh my gosh! I’m so glad that I finally got this project done! Even with the walls patched and not painted the white trim already makes the room so much fresher and cleaner and brings it into this century.
Next up, the walls need to get painted…
which I will tell you about really soon….but in case you didn’t know, you can go immediately (dry time not included) from painting the trim to the walls simply by using Frog Tape® delicate surface. Which is of course, exactly what I did because I did NOT want to wait for the cure time on the trim. If I was going to get this project done, let’s get it done!
What tips and tricks do you have for how to paint trim? Leave me a comment below.

Hi! Did you do all 3 coats of paint on the trim in one day? If you remove tape before paint is dry then you’d have to do all 3 coats in one day right?
I’m pretty sure I answered you on Instagram, but just in case, no, I didn’t do them all in one day. I put the tape on one day. I think I did a coat per day of the trim. Then after the last coat I removed the tape. You can check the tape packaging for how many days you can leave the tape on and get clean removal. I also recommend you spend the extra money on the Frog Tape because it’ll work best if you have to leave it on a little while to get the job done. I’ve tried other tapes and have some nightmare stories. Frog Tape is the best!
I read somewhere that putting a coat of wax on the dried paint helps with chipping, etc. Have you tried this? Also, using a paint with primer, can I skip the primer to begin with?
I wouldn’t recommend wax. Starting with a coat of primer will accomplish the same thing and lasts as long as the paint. You can skip the primer, but in my experience, it never works out. I always regret not starting with primer. It is worth the time and money in my opinion.