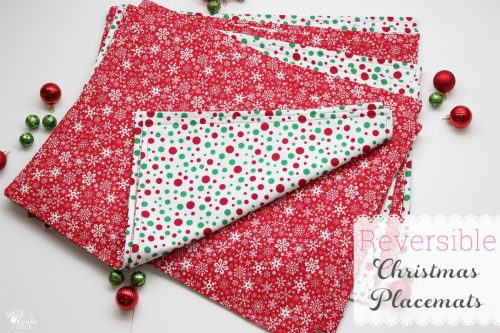
I have wanted to complete this project for so long! I think I bought the fabric back in January. Finally, this week I figured out how to sew placemats for our family. Now I can show you how to make placemats. . Can easily be used for any holiday or special occasion.") Just like the rest of this similar fabric that I used to make a reversible table runner, I wanted reversible placemats as well.
Just like the rest of this similar fabric that I used to make a reversible table runner, I wanted reversible placemats as well.
They would have been a very simple project had I not decided I wanted an applique on them as well. I’m just going to show you how to make the reversible placemats today. I have a how to cut fabric with a Cricut here which is what I did to cut out the appliques.
I started the project by measuring one of my current placemats to figure out the finished size. My placemat measured 17.5″ by 13.5″.
Make sure you wash your fabrics before cutting and sewing them as they will be washed frequently. If you don’t wash them, they will likely shrink and change shape.
Cut your fabric at 18.5″ by 14.5″. With .5″ seam allowances, that will give you the finished size of a standard placemat. Of course, if you want your placemat bigger or smaller, cut accordingly.
To make a reversible placemat, you will want to cut two of these rectangles for each placemat. You will also want some sew-in interfacing cut to the same size. I used Pellon 910 sew-in interfacing. (affiliate link)
. Can easily be used for any holiday or special occasion.")
If you are using an applique on your placemats, place them in the lower left-hand corner. I wanted mine to be about 1″ from the finished edge. It is the perfect place to still see the applique while the plate is on the placemat.
. Can easily be used for any holiday or special occasion.")
To allow for the seams, place your applique at 1.5″ from the left-hand side and the bottom.
. Can easily be used for any holiday or special occasion.")
This is the most important part of your project. Get the fabrics and interfacing in the correct order. I didn’t think it through the first attempt and had to use the seam ripper to take the whole thing apart.
Place your two fabrics together, right sides together. Place the interfacing on the top or the bottom of your two fabrics. It doesn’t matter whether the interfacing is on the top or the bottom, just so long as it is not in between your two fabrics.
. Can easily be used for any holiday or special occasion.")
Pin your layers together and sew using a .5″ seam allowance. Leave a 4″ opening in the bottom center of the placemat.
. Can easily be used for any holiday or special occasion.")
Clip your corners and pull the fabric through the center opening to make it be right side out. Iron the placemat being careful to lay the unsewn seam neatly following your .5″ seam allowance.
Topstitch around the entire placemat using a .25″ seam allowance. This will close the hole you used to pull your fabric through and help keep the layers of the placemat in place even with washing and use.
. Can easily be used for any holiday or special occasion.")
All done! Without the applique, this would be a very quick and simple project. My appliques turned into a whole problem and craft bust and took a lot longer than they should have, so my project ended up taking a few days. Fun times!
. Can easily be used for any holiday or special occasion.")
Now we just need to set the table for dinner.
. Can easily be used for any holiday or special occasion.")
See how I used the placement of the applique where it can be seen even with the silverware and dishes on the placemat? Of course, the napkin would cover it up some, but most of the time the napkin is in the lap anyway.
I think learning how to sew placemats was fun (other than the craft fail part of it) and I love the look and the quality of the finish. I could totally see making some fun placemats for lots of different occasions and holidays. I just need some storage space for placemats and I’m good to go.
Have you ever made placemats? Any other tips, tricks, or ideas for us?
Check out my reversible Christmas placemats here.
Don’t forget to sign up for my free email newsletter so you don’t miss a thing!
How are the appliques a craft fail? They turned out cute!! I linked to your tutorial over at Craft Gossip:
https://sewing.craftgossip.com/tutorial-sew-a-set-of-reversible-placemats-3/2013/07/29/
–Anne
The appliques were a craft fail because it took two or three attempts to get them cut out and then I had some issues with sewing them on. I think they turned out cute as well, but they were a bit of work to figure out. Thank you so much for linking my tutorial up at craft gossip…that is very sweet of you.
KC
Wow. So impressive. I love your applique. I’ve tried but never had success. Those are so cute. It’s like you could make custom ones for a big dinner party.
Thanks! I could make custom ones for a dinner party…you having one this summer in your little house with the remodel going on? 😉
Take care,
KC
These are some really lovely placemats. I love that they are reversible and that they are so darn cute! Nice and summery. 🙂
Thank you so much, Libby! I love reversible, too. I tend to get board with things, so reversible works really well for me. They were so easy, I think I will be making more of them.
Enjoy your blog break!
KC
Those are so cute! I love the bright colors. And you’re right, you could make some for the holidays, too!
Nikki
Thanks so much, Nikki! Yeah, you just might see some more in a later post. 😉
Take care,
KC
Sweet and colorful! Pinned to my dishware and table board! I posted DIY Doily Jacket this week. Stop over:)
Thank you!
These are sooooooooo cute!
Beautiful colors and pattern and I really like it
Thank you! I love bright colors…glad to know others do as well. They are just fun.
Take care,
KC
These turned out so cute, KC! I love the fabric! I’d be honored if you linked this post and any others up to our All Things Thursday Blog Hop that goes live at 8pm Central tonight. Have a great week!
Blessings,
Nici
Thank you so much, Nici! I hope you have a great week as well.
KC
Very cute! I have some “fruit and vegetable” fabric that I need to make placemats out of!
–Gena
Thank you! I bet fruit and vegetable fabric would be really cute for the dinner table. Great idea!
KC
Super cute! Nice bright colors and fabrics!
Navy Wifey Peters @ Submarine Sunday Link Party
Thanks! We like bright colors. How about you?
KC
Hi KC these are so cute! I would love for you to share them at the Krafty Inspiration Thursday Link Party over at Krafty Cards etc. https://kraftycardsetc.blogspot.com/2013/08/krafty-inspiration-thursday-2.html
Thanks for the inspiration!
Maria
Thank you so much, Maria.
KC
These are SUPER cute!! Thank you for sharing. Just love them!
Melissa
redflycreations.com
Thank you!
KC
What a fun project idea, KC!! I would love for you to link up to my Tasty Thursdays party going on right now. https://www.mandatorymooch.blogspot.com/2013/07/tasty-thursdays-52.html
Thanks, Nichi – The Mandatory Mooch
Thanks so much!
KC
Lovely placemats!
Applique is just a tchnique. When you now how, you have those appliques in less than an hour and finish your placemats in a day!
Thanks! Yes, now that I know how to cut out the fabric on my Cricut, it will be a breeze.
KC
ooo these are amazing!!!I love it!
big hugs
https://freestilcreatingbyvilly.blogspot.gr/
Thanks!
Ty for sharing this, I’ve been looking at how to’s to make my own. I would love it if you would link up at our first linky party this Wednesday :
https://thekoenigscreate.blogspot.com/
Thanks…I hope this tutorial helps you out.
KC
Ty for sharing this, I’ve been looking at how to’s to make my own. I would love it if you would link up at our first linky party this Wednesday :
https://thekoenigscreate.blogspot.com/
Very cute! I love that they are reversible
We’d love it if you would come link up with us on Much Ado About Monday!
https://www.huckleberrylove.com/2013/08/much-ado-about-monday-no-21-fun-giveaway.html
Karla
http://www.huckleberrylove.com
Thank you! The reversible makes them so fun and double the decor.
KC
These are super cute. Love the patterns! Thank you for linking up at The Weekly Creative!
Smiles,
Melanie
Reasons To Skip The Housework and The Inspiration Network
Thank you so much and Thank you for hosting each week.
KC
They are very cute! I haven’t thought about making my own! (Probably b/c I can’t sew very well 😉
Lol! They aren’t hard to make even if you don’t sew very well. If you can sew a mostly straight line, you can make these.
Take care,
KC
Love the fabric you’ve used, KC and the appliques just finish them off beautifully!!! A great tutorial…
I’ve featured your placemats today… https://www.threadingmyway.com/2013/08/threading-your-way-features_17.html
Thank you, Pam! Thanks so much for the kind words and the feature! These sure have added some fun and color to our table.
Have a great week.
KC
Great placemats! And the fabric is wonderful! Thanks for the tutorial.
Have a great weekend!
Hugs!!!
Thank you! I hope you find the tutorial helpful. Enjoy!
KC
Too lovely!!! Those placemats are really gorgeous!Thanks so much for sharing the great tutorial! Would love to have you visit my blog sometime.
Have a fabulous weekend!
Hugs and love from Portugal,
Ana Love Craft
http://www.lovecraft2012.blogspot.com
Thank you!
KC
Love ’em! Very fun and cheerful. Thanks for showing us how you made them. Just might have to make some for my girls too! 🙂 Angela from sunnysweetlife.blogspot.com
Thanks so much! I’m thinking of making some for other seasons, too. Enjoy!
KC
How do you wash these? Spot clean or can you use Delicate Cycle on your washing machine and then lay them flat to dry? My husband can be super messy. 🙂
The fabric I picked is cotton, so I prewashed it. Now it can be washed just like any other cotton (by prewashing it, it has already shrunk as much as it is going to). I wash them with our other towels and such which I usual wash in warm water and dry on delicate or medium. Because I use the dryer, they probably need to be ironed, but I hate ironing and they seem to look ok by just flattening them out.
Trust me, my kids and my husband have already given them a workout and gotten lots of stuff on them.
Take care,
KC
how much material did you need to make 6?
I’m fairly certain I bought 2 yards. I bought the fabric so long ago that I’m not certain. I just did the math 18.5″ x 3 (because my fabric was wide enough that I could cut two wide and three long) that is 55.5 which if you divide that by 36″ (a yard) it is about 1.5 yards. Like I said, I’m fairly certain it was 2 yards I was working with.
Hope that helps!
KC
Anonymous, You can get 2 placemats from a half yard of 44″ wide fabric so you will need 3 yards of each fabric to make 6.Good luck
Anonymous, I need to correct my math, it’s late and I’m tired you can get 6 placemats with a yard and a half of each fabric for a total of 3 yards. Hope I didn’t confuse you.
Thanks for your help with this. I’m pretty sure I used 2 yards of each fabric. I bought the fabric so long ago, I can’t totally remember, but I’m pretty sure it was 2 yards.
Take care,
KC
very nice
Nice, I love them 😉
What a fun and quick project, the placemats look so nice! The applique really gives them a beautiful touch. Thanks for sharing this tutorial, it’s great for beginners.
I featured the tutorial on my blog here: https://www.sewingshop.net/blog/reversible-placemats/
Thank you and thank you for sharing it with your readers!
You’re welcome!
Regarding the placemats: What kind of fabric would you suggest? I’m thinking that a cotton one would be easy to stain. What would you suggest?
Mine are made from a cotton fabric and surprisingly (with 2 kids), I haven’t had any problems with staining. I have tons of problems with staining on other things, but thus far these haven’t been an issue. I’m not sure what other fabric that you could use that would be less stain resistant. The cotton washed up really well, so that is why I selected it.
I was really feeling the need to “ground” myself and I often do that by creating. This project caught my eye and worked up in one evening. I made 8 of them last night and loved the project, the process and the outcome. Thanks for sharing!
Oh, I’m so glad you found the post and that you enjoyed the project! Thank you so much for letting me know. I love getting comments like this!
Those are adorable!!! I love the fabric!
I can’t wait to try this! Is the interfacing a requirement? If I do not use it, will it lead to problems down the road? Thank you.
I don’t think you would have to use the interfacing, but I prefer them with it. It adds some stability to the placemat so they are totally floppy. I prefer that, but if you don’t mind or don’t like that, then go without the interfacing. I can’t think of other problems…other than that they may wrinkle more, which would be a huge problem in my book, since I never iron. 🙂
Thank you very much! 🙂
These are so adorable!!! I’m going to attempt for my first sewing project and wondering what kind of fabric should I use.
Glad you like them! I used a cotton fabric and think it works well since they will get washed quite a bit.
I just found your site today, after searching Pinterest for place mat tutorials. Your site is so cute, and I’ll definitely be adding it to my favorites so I can come back for a visit! I’m going to give these a try (minus the applique) for Christmas gifts for my mom. Thanks for the instructions! I’m a newbie at sewing, I actually just got my sewing machine about a week ago. Hopefully I can pull these off!
I have faith in you! I promise these are really easy. They are pretty much sewing a straight line with a couple of corners. To me, the hardest part is putting the fabric and the interfacing in the right order before you start sewing. I usually get that wrong or have to pull up my own blog to make sure I get it right. Lol! You’ve got this! Let me know how they turn out. I’d love to hear.
Love your placemat with the appliance. Wondering how the pattern would work with iron on interfacing?
*applique*
🙂
Thank you! I’m assuming you mean the iron-on in the center of the placemat not the applique, right? Because I did use iron-on for the applique. I’ve never tried making the placemats with iron-on interfacing. I don’t know why it wouldn’t work. It would probably change the feel of the placemats. They may be a bit more stiff. Let me know if you give it a go and how it works out.
What a great idea! Thanks for sharing at the #HomeMattersParty
These are a lot of fun! There are some colorful fabrics in my stash that I’ve earmarked for placemats and your post was a reminder to get to it. Thanks for sharing.
Thanks! I hope you have fun making your placemats!
Hi KC! First time here & dropping in from Craft Frenzy Friday…saw your post on there…just wanted to say hi and say how nice the placemats are! So fun and cheery! I love the fabric you chose, and looks like an easy project that even a novice sewer like me could do.
Florence
My Mom has made me some beautiful placements and I just treatsure them! Wanted to pop by and say thank you for sharing with us at #FoodieFriDIY – featuring your fun project this week, so make sure you stop by and check it out!
Oh, that is so neat! Thank you for the feature!
So, I’ve been looking for some square placemats that aren’t going to break the bank to use in the camper. They HAVE to be washable. Well, I haven’t had much luck, but after reading this post, I realized I could probably just make some. I picked up some fabric at the store recently, but wasn’t sure how to incorporate it into the use of the camper. Now I know!!
Thanks so much for the inspiration!!
Yay! Glad you found these. It will just be a matter of changing your sizing to be square. I have been using these for years and they wash up well and dry well without ironing (because I NEVER do that!).
Is their a printable for this project?
No, there is not a printable. All of the measurements are written within the post.
Thank you for this! I have made several sets of placemats using fusible fleece inside, following instructions I found elsewhere on the internet. I was always frustrated with the fleece stretching out and sliding around when I ironed it. This interfacing was much easier to work with and the mats look great!
I’m so glad this worked and even worked better than what you had tried in the past. Yay! I love hearing that. The placemats I’ve made have held up really well even for the long haul of a couple of years. 🙂
I love those placemats! I featured them in my Easy Sewing Projects for kids on our blog!
Thanks for sharing!
Thank you so much for featuring me and letting me know!
I love the placemats. I have been making a lot of different items. I make bingo bags. I make bingo pads. They are kind of like bingo placemats. I have been making brush holders for my ceramic brushes. I love making things. I also make dream catchers. I do the diamond paintings. I am 68 yrs old and I keep myself very busy. I usually don’t get bored. Plus I go to a ceramics club and work on ceramic pieces. Plus I do aquacisors which is exercising In water. I love that you make placemats for the table. If you put your mind to it you can basically make anything. By the way I love your placemats.
Thanks! I’m glad you enjoy them. I bet they would work well for your bingo pads. Enjoy all your creative endeavors. Sounds fun!