I’m back with the third post in my series of different methods of photo organization. With Easter quickly approaching, I thought this would be a great time to look at another method of organizing your digital photos.
Today, I’m going to show you my complex method of photo organization. The first post I wrote in this series was for those of you who feel very intimidated by this process and need something super simple. You can view that post here: Photo Organization: Simple Method. The second post was for those who are not intimidated by the process but want to keep it simple and quick. Photo Organization: Medium Method

I’m going to show you how to take your photos from your camera to organized, rated and edited, printed, and backed up in 6 steps. I realize that a lot of people do not print photos anymore. It is your choice as to if you print your photos. I think that ultimately you take photos to enjoy them. They either need to be put together in a digital album and printed in that format or they need to be printed and displayed or printed and put into a traditional album. You take the pictures to remember and enjoy the event…so do something with them. Hopefully this series can help you figure out a method that works for you and is not overwhelming in order to accomplish this goal.
This complex method has 6 steps:
1. Upload
2. Organize
3. Rate/Edit
4. Choose pictures
5. Print/Use
6. Backup
Let’s talk about each one a bit.
Step 1: Upload Your Photos to Your Computer
We’ve gone over this step before and I’m going to guess if you want the complex method of organizing photos, you know how to upload your photos.
Whatever software you use, make sure it has the ability to organize things in folder or something similar and that it has the ability for you to rate your photos. Those two things are essential for this method of photo organization.
I use Creative Memories – Memory Manager 4.0 (CM MM 4.0). I have used it for years. I absolutely LOVE the organization features of the software. They have also, in recent revisions, made the editing features much more robust. (I am not a consultant and make nothing if you decide to use the CM software.)
Since the CM software is no longer available, here is a good article I found with a list of 12 software solutions for organizing your photos. Top Digital Photo Software for Family Photos.
Step 2: Organize Your Photos
I’m going to recommend that with this complex method of organizing your photos you organize them 2 ways. This will make it super simple to find any photo of any person at any time. For those that are like me, I’m also going to recommend that you not go crazy organizing them 15 ways. 2 ways is sufficient, but occasionally it will make sense to add a 3rd or 4th way. I’ll talk about that after I have discussed the first 2 ways to organize your photos.
In an effort to keep this post somewhat short, I’m going to refer you to the medium photo organization if you need the specifics of how to organize your photos into folders. It goes into more details on specifically how to do this.
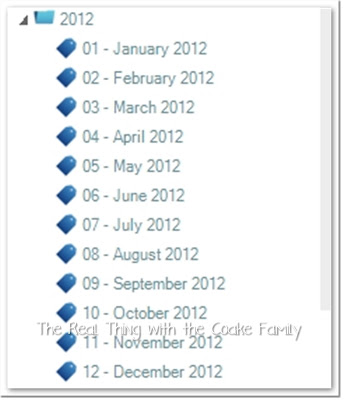
For this post let’s just say, first, organize your photos by putting them in a folder by month and year. Again, if you need more detail refer to the medium photo organization post.
Second, tag the people in your photos. I’m not going to suggest that you tag every single person, but tag those that you have lots of contact with or those for whom you might be searching for photos.
The third way you can tag your photos, but you don’t have to, is for certain projects. For example, each year in December, I buy my girls an ornament. I take pictures of the ornament as well as of the girl with her ornament. Those pictures get put in an ornament album for each girl. It makes sense for me to have an ornament category and a tag for each girl under that category. It makes it really easy to find those pictures when I am ready to put them in their album.
I don’t tag Girl Scout events. You know why? Because while we love Girl Scouts and have plenty of pictures from events, I have no plans to make an album that is just Girl Scouts. It would be wasting my time to tag all of those items into a separate category.
My point with this third option is to think through what you really need in terms of categories. Don’t spend more time here than what your current needs are. It can be really easy to spend way too much time, if you are like me, on this step. Resist the urge!
Step 3: Rate and Edit Your Photos
Beyond the possible adding additional categories and tags to your photos, rating your photos is what really sets this method apart from the medium method of organization. This definitely takes additional time but, in my opinion, it is worth it in the long run.
Here is what I do.
This is a screenshot from within my software. Can you see the area on the right of the screen where it has the name and the date of the photo? Just below that do you see the ‘Rating’ area? I can rate my photos from a 1 star to a 5 star. Personally, if a photo is a 1 star, it gets deleted. I have virtually no 1 star photos in my library. As far as this picture, let’s just say I thought this was the best picture I have ever taken. I would give it a 5 star rating.
Here is how I use my ratings:
- 5 star rating = spectacular photo. I 100% want to use this in my album or print and display this photo.
- 4 star rating = great photo. I really want to remember to use this picture in my albums.
- 3 star rating = good photo but lacks that extra something to be a 4 star. I will use these if I don’t have a 4 star photo(or above) of the same thing and I need this in my album.
- 2 star rating = mediocre/low quality photo. Only used if there are no 3 star or above photos of this event. Often I delete 2 star photos as well as 1 star.
- 1 star rating = deleted photo. Won’t even use it if it is the only photo I have.
You can see my rating in the screenshot above. I rate this photo a 4 star. It is a good picture and I also know the back story of the photo/event and the bird riding on my purse as well as how Snowflake did such a great job taking this picture. I really want to make sure I use this photo when I get to these pictures.
While you are going through each of your photos to rate them, it is a great time to edit the photos as well. I’m not going to go into that here.
Step 4: Choose Your Photos
This step is where you see the fantastic benefit from the step 2 and step 3. It now becomes so easy. Let me show you.
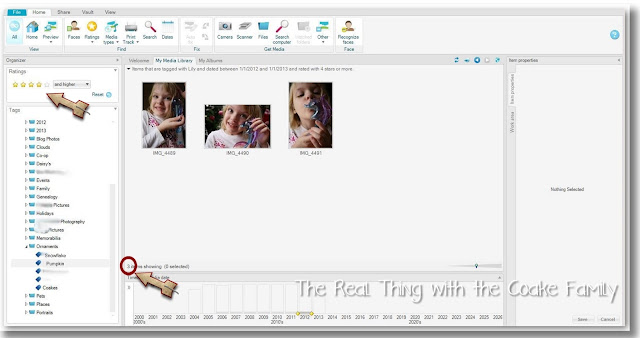
Let’s go back to my ornament example. Now, I am ready to put photos into Pumpkin’s ornament album. This is a screenshot of my software. I have clicked on her ornament album and narrowed it down to 2012 only. I now have 22 pictures of her with her 2012 ornament. That is still way too many for her ornament album. Often when I do this for our family album, in a month like December, it will say 500+ photos. This next step helps tremendously.
Now, can you see where I selected that I wanted 4 star or above photos in the upper left hand corner? This one step has narrowed my 22 pictures down to 3. For this album, I only want 2 maybe 3 pictures. So this one step and I am done with selecting. For our family album, I often select all the 4 star and above pictures, then add the 3 star photos to fill in and make sure I got enough photos to tell the story of that event. It makes selecting photos so much easier.
Obviously, you can see from this, I do not hold the philosophy that every photo needs to make it into an album. I cut lots of photos and I think you should, too.
Step 5: Print/Use Your Photos
I’ve covered this before, and since you are a more advanced user, I’m going to guess that you know how to print your photos or how to move them to your source to make a digital album. I do just want to say that I highly recommend printing with a web provider versus a local store. You will save so much money this way. My personal favorite provider for photo printing is Shutterfly . If you are a Costco member, they offer great prices as well. I usually order my larger prints and canvas prints from them. Their prices can’t be beat, but you do have to be a member to use their service.
Step 6: Backup
The last thing you need to do with your photos is to make a backup. Any photos you have uploaded to your provider for printing will be backed up on their server. As I’m sure you know, most web based providers require that you make a purchase every so often for them to continue storing your photos. If you are like me, the photos that are uploaded and printed are only a small percentage of your photos. You will need to make a backup of your photos to preserve all of them.
You can make your backup automatic by setting up an account with a company such as Dropbox or you can back them up onto disks or an external hard drive. I used to use disks…they are supposed to be the best. Specifically the gold archive CD’s are supposed to be the best and most stable to use. They do get expensive and depending on how many pictures you take and the mega pixels of your photos, you could go through disks like water. I have switched to backing my photos up on an external hard drive and really hoping that it is enough. I would feel tons better using the disks, but our budget doesn’t permit it given the number of pictures and the quality of the file I save.
That is it…you are done.
- You have uploaded your photos to your computer.
- You have organized and tagged your photos.
- You have rated and edited your photos.
- You have selected the photos you want to use.
- You have printed or used your photos.
- You have backed up your photos.
Doesn’t that feel great? Organized and rated photos that are easy for you to find and use them any time you want/need…love it!
More Great Posts for You:


What great tips ~ I need to do this ~ my pictures have seriously gotten away from me but at least now I know how to start tackling them!
Thank you. I hope this is able to help you so you can get them under control. 🙂
KC
Wonderful step-by-step overview! I also use MM4 but have been a bit slack lately with organising them so thanks for motivating me to get this done!
Thank you! I hope this ends up being helpful for you.
KC
Thanks for posting this. Gives me some ideas, because I definitely need a complex method with all the photos I have. I’m going to modify and create a layout that works with the software I use. Just switched from PC to Mac so things are a bit different. Thanks again for the inspiration!
How is your transition from PC to Mac going? I hope somehow this post can be helpful to you.
Take care,
KC
What an awesome tutorial… so helpful! I must get organized 🙂 I’m so glad you came to share at Super Saturday Show & Tell… come back again next week to party with me again 🙂 xoxo~ Ruthie
Thank you, Ruthie!
KC
Great tutorial! Something I definitely need to think about since I take so many photos.
Thanks! Yeah, I think, when you take lots of photos, you need some type of system or they can just get out of hand and you can’t find anything. That may just be my personality though as I know not everyone needs a system.
Take care,
KC
Great tips on organizing digital photos- I so need to get mine under control. Thanks so much for sharing over at Finding the Pretty & Delicious Linky Party – hope you’ll visit again next Saturday!
Thanks, Leigh Anne.
Take care,
KC
I so need to get around to finishing organizing my photos! Your tips will really help me to finish the job! Thanks!
Oh, I’m so glad I could help.
Take care,
KC
My favorite part of this post is the Rating System! I’m always torn on how to rate & I don’t have a consistent method. I’ve always rated the good ones, but never thought about rating the bad ones — such as for “delete”. Thanks!
– Lora
Thanks! Glad I could help give you an idea.
KC
Such a wonderful post!! Thank you very much for the advice!! I included it in my post Βόλτα στη Γειτονιά #25 🙂
Have a great week!!
Thank you!
KC
Great idea, this is something I have put off for years. I so need to get it together! I take so many pictures…this task just gets more daunting everyday. 🙂
I totally understand. You can always decide on a plan and break it down. Work for 10 minutes a couple of times a week. Work as fast as you can…you will see progress…at least it works for me.
Take care,
KC