
The cuteness doesn’t end around here lately! I’m having so much fun making all these cute crafts and following my gut as far as colors and inspiration.
Have you ever done that? Gone off instinct and what you’re diggin’ right now? I’ve tended to hold back and play it safe, but with the pumpkins and ornaments, I made I started blazing my own trail and haven’t looked back. I’m loving it!
Then I made the gingham wall art and the happy cuteness train continued on its happy little journey….sorry, I’m a dork….so you’ll have to deal with my little analogies. ??
I’m a little later than I wanted to be in getting this valentines wreath made, but it’s done before valentines day, so I’m calling that a win.
It also looks so cute layered on top of the gingham wall art on my fireplace, it was worth the little bit of lateness.
Don’t worry, I’ve got you covered. You can follow the tutorial and make your own valentines wreath. This is another craft you can break up into small steps and fit between life with the family. Yay!
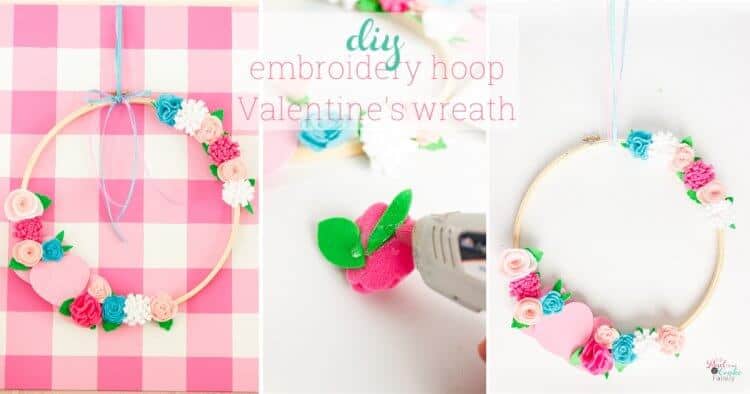
Embroidery Hoop Valentine’s Wreath
Supplies:
- Embroidery Hoop (mine is 12″)(affiliate link)
- Wooden hearts
- Paint
- Paintbrush
- T-square (optional)(affiliate link)
- Disappearing ink marker (optional)(affiliate link)
- Cricut maker (affiliate link)
- Cricut rotary blade
- Felt
- Hot glue
- Hot glue gun
- Mod Podge Hot Glue Finger Caps (affiliate link)
- Mounting squares
- Ribbon
- Scissors

Step 1: Paint hearts

As easy as it sounds. Paint your wood hearts.
I painted 6 hearts and only used 3 hearts on my wreath.
Step 2: Cut felt to size (optional)

If you’re using your Cricut Maker to cut your felt flowers and your felt is larger than the standard 12 x 12 Cricut mat, you’ll need to cut it down to 12 x 12 size.
I find this easiest to do using my t-square and a disappearing ink marker.
Mark lines at 12″ with the marker. Connect the lines and cut on that line.
Step 3: Cut felt flowers

Next, you’ll want to cut out all your felt flowers. You can cut felt flowers with scissors, but I let my Cricut do the work for me.

If you’re using regular(not stiff) craft store felt, you’ll want to use the Cricut Rotary blade and the sewing/fabric mat. The Cricut design studio will set the correct settings if you set your machine to acrylic felt.
I also have a link to the cut file for my flowers below. They were a paid item, so you may need to buy the cut files, but they’re all in there and set to the sizes I cut for my wreath, so that saves you a step.
Step 4: Make felt flowers
Once you cut the felt, make the felt flowers using hot glue to keep them together. I’ll have a post on how to make the different flowers soon.
Step 5: Add hearts to embroidery hoop

Now that you’ve painted and made flowers, you’re ready to put your wreath together. 
First, add your hearts to the hoop in whatever configuration you like.
I added two hearts as a base and hot glued them in place. 
Then I added some foam mounting squares to the back of another heart. I hot glued the foam mounting squares to the heart because I’m not sure if they’re designed to stick to wood and I wanted to make sure they stayed on.
I then added hot glue to the other side of the foam squares and placed the heart in the middle of the 2 hearts already on the embroidery hoop.
Step 6: Place flowers on hoop – don’t glue yet

Now, I like to do a dry run with my flowers. You don’t have to do this, but I like to because it gives me the chance to see what the end result will look like and make any changes before I make things permanent.
Step 7: Hot glue flowers to embroidery hoop


Once you have your flowers where you like them, hot glue them into place.

Step 8: Add Ribbon to hang

Add ribbon to the wreath to hang.
I made my ribbon long because it was going over the back of my gingham wall art. There’s a nail in the wood piece behind the frame that I can attach the ribbon to.

Once I got the wreath in place, I added a dab of hot glue at the base of the ribbon to hold it in place on the embroidery hoop.
I then made a bow and hot glued it into place as you can see above.

All done! and so cute!
It’s a perfect addition to my valentines mantel and it looks great layered on top of the gingham wall art.
Now I’m already thinking of what to do for spring/Easter….hmmmm ?. You’ll have to come back to see. ?
What are you diggin’ for valentines day decor? Any particular trend or colors you’re loving? Leave me a comment below. I’d love to hear and I’d love to hear what you make that’s ideas from what your diggin’.
Get your Cricut cut file by logging in below.
Adorable!! Love the gingham art piece!
Thank you! I had imagined the gingham wall art and absolutely love how it turned out. Happy days for that one for sure! How are you? It’s funny to see my college roomie here(at least I assume it is you since the name is the same). I love it!
That is so cute! I’ve neglected embroidery for so long now as I’ve been on a crochet kick, but still have my stash of embroidery thread, might give this one a go! Not sure if it’s ok to post this, but I’ve just set up a brand new link party myself for all yarn crafts – would love it if you’d share this there. I found your post via DeniseDesigned link party 🙂
Thanks! Have fun making it! If you do make one, send me a pic. I’d love to see it!
This is BEAUTIFUL! What a lovely and original idea! Love it!
Thank you!
Such a cute wreath and great tutorial. Thanks for sharing!
Thanks!
Love this, and the colors are so vibrant! I can see it being tailored to other special occasions as well.
Thanks! I totally agree! I think I may end up making something similar for another holiday….we’ll see. ?
This is such a delicate and pretty wreath! Thanks so much for sharing it at Project Inspired.
Thank you!
I Love this.
Thanks so much! Mine is back up over my mantel again this year. I love it – too cute!
KC