For today, I’m only going to show you the steps for how to remove the carpet from the stairs. I’ll show you the steps of painting the stairs next month in another post.
I know that sometimes it feels overwhelming to figure out how to tackle that DIY project you want to tackle…how to know what to do and in what steps to get the job done. On top of that, as moms, we split our time between so many things that often we don’t have a full Saturday or weekend to tackle a DIY. We don’t have to let that stop us. We can still get the job done if we look at it a little differently.
That’s where I come in. I’ve finished this project, so I’m going to show you the steps to get it done. I’m also going to break it down for you into pieces you can get done here and there among mom life. That way you can have the pretty house you want with the time and money you’ve got.
If you want to see how to paint the stairs – and how pretty the full makeover is – sign up for my email. I’ll make sure to send you an update when I’ve got the post done about painting the stairs. And if your a busy mom like me, and you often feel stressed and overwhelmed with all that motherhood throws at us, I’ve got a class that’ll help you put systems into place so you’ll feel less stressed and overwhelmed and find more time for these DIY projects. Yay! Sign up today and get started removing that ‘mom brain’ syndrome from your life!
How to remove carpet from stairs
First, before I get to the step by steps for you, this project needs the right tools. If you have the right tools, it’ll make the job a lot easier.
Tools:
- Utility knife (affiliate links) – you need a sturdy knife for cutting carpet
- Hammer
- Crowbar
- Needle nose pliers
- Nail puller
- Work gloves
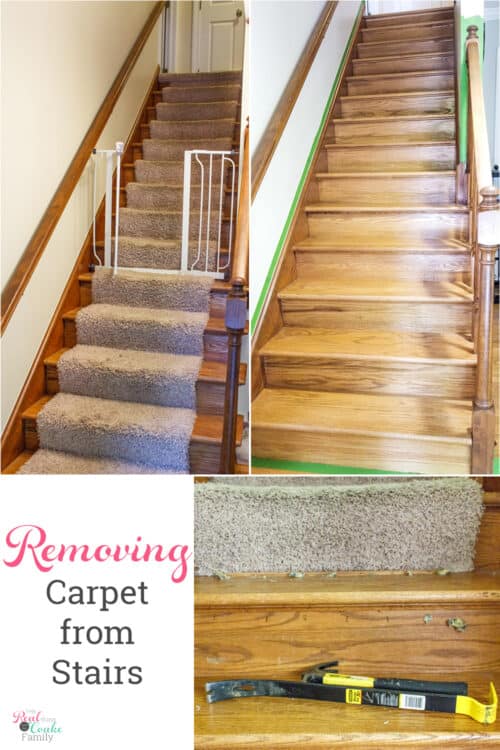
Before:

Can we all say…ugh! These stairs were so ugly! I can’t wait for you to see the final reveal and how prettier they are now. That said, I’m sure you’ve seen stairs like these before.
Step 1: Remove Carpet and padding

First up you need rip up your carpet.
There’ll usually be a loose spot somewhere. Use that and rip from there. If not, start at the bottom and use your nail puller to loosen a piece and pull from there to rip the carpet up.
Be careful as you rip and pull as there’ll be staples or nails in the carpet.
MOM TIP:
Most often you’ll find that a carpet on the stairs is one long piece. If you have time and patience(and you’ll need a lot of patience) to tackle this project all in one go, then rip it all up at once. If your life is like mine, and there’s no way you have the time or patience to do this in one day, use your utility knife to cut the carpet at the spot between the tread(the wood you step on) and the riser piece(the piece of wood that is vertical). That way, you can do a couple of steps at a time and work during the time you have to get the job done between your busy life.

You’ll most likely have a moment of total and complete disgust at what lies under your carpet and padding.
I mean, it’s disgusting!
Step 2: Remove tack strip

Now you need your best friends in this job, the crowbar, and hammer.

As best you can work the narrow end of your crowbar under the tack strip.
Try to do this at a spot that has a nail. That won’t always be possible because sometimes it’ll be too tight at that location. Do the best you can.

Once you have the crowbar under the tack strip, hit the end(the yellow part on the right side of the picture above) with your hammer to get it under the nails. When you can tell the crowbar is fully under the nail and the strip, you can press in a downward motion to lift up the tack strip and nails.
The ideal and easiest thing for this job is to get the tack strip out all in one piece, but if your job goes like mine, you’ll only get a few out that way. It’s OK and doesn’t matter.
This is loud work. It won’t work to do this job after the kids go to bed.
Keep working your way down the tack strip until you’ve got the whole thing out.

Success! The whole tack strip out and in one piece.
I only had a few that came out like this. Most of mine came out in many pieces. Again, it doesn’t matter. Just get the tack strip out.
Step 3: Remove nails and staples

Unless you’re a DIY goddess, you’re going to have nails and staples left on the treads and risers.
This is where you’ll need a decent amount of time and patience.

Use needle nose pliers or the nail puller to get the staples and nails out of the wood.
I used needle nose pliers to do this job, and I think you’ll need them as well. I discovered the nail puller(affiliate link) tool when I was working on my antique chair makeover, and I wished I’d know about that tool for this project. It would’ve made getting the staples out SO much easier. So, I recommend that tool for this job.

Tips:
1. The job of ripping up the carpet and pad, while disgusting, is usually pretty quick.
Don’t let that lull you into a false sense that this will be a quick project.
You’re going to have tons of staples and nails to remove from each step, and in my experience, it takes forever. Usually, more time and patience than I have for a day as a busy mom. That’s why I recommend using your utility knife and doing a couple of steps a day. It may seem annoying to break it up. It’s better to break it up than leaving it half finished for one of the kids (or yourself) to rip a foot open on staples or nails left in the stairs.
2. Work as patiently and carefully as you can when you’re using both your crowbar and when you’re removing the staples or nails. You want to do as little damage to your stairs as possible.
If you know for sure you’re going to put down new carpet or paint your stairs, you don’t have to be as careful. If you plan to leave the stairs as is or stain them, all that damage means more work later on for you.

I was lucky.
The stairs looked great under the carpet and were in good shape.
This is definitely not always the case.

We lived with the stairs like this for almost 2 years before I painted them. Because my stairs were in such good shape, I didn’t have to rush to get the job done.
As you can see, I’ve got the stairs taped off to paint them. In real life, I’ve got that done, and I’ll share that tutorial with you next month.

Even the step of removing the carpet helped improve the look of my home. The carpet was gross, dirty, and old.
It felt so good to get it out of here and off the stairs. I’ve also had a lot less trouble with tripping on the stairs with no carpet. I wondered if it would be a problem when we wander the house in socks in the winter, but that has been fine as well and still fewer issues than we had with the carpet.
I’ll be back next month with the post on how to paint your stairs and to show you the after of my staircase makeover. It looks so good!
Follow me on Instagram to see real life updates on projects I’m working on as well as more real life fun.
I’ve been wanting to do this for a while to my ‘80’s house. Thanks for all the tips-can’t wait to see the finished project?
80’s homes unite! lol! If you’re like me, you’ll be so glad when you do remove the carpet.
I can’t wait to show you the final project. It looks so great!
What a transformation looks great. Pinned
Thanks!
We’ve yanked carpet off our stairs in preparation for new carpet. It was so gross! All the dirt that settles there where the vacuum couldn’t quite get it. Hardwood stairs are so much cleaner. Your stairs look great!
Love this! Can’t wait for the painted reveal! laura in CO
Thanks!
Your stairs look lovely!! The wood is beautiful! I have thought of having wood stairs but I just had knee replacement surgery and will need the other knee done in the future. Since I am a bit of a klutz, i am afraid it would fall down these steps….But they are charming!!
Hugs,
Deb
Thank you! I would have thought the same thing about our stairs as well. I’m not sure if it’s because our carpet was a shag carpet or what, but I’ve tripped and fallen on the stairs way less than when we had carpet….and I’m a total klutz! I’m glad that for us it has worked out to be safer. Now that they are painted, they feel even more sturdy and safe. ?
Wow, just wow. What a transformation. I’ll be featuring your post on Sunday’s Best Linkup. Thanks for sharing.
Thank you! And thanks for the feature and party!