• Home
  • Contact
  • Privacy Policy & Disclosures
  • Nav Social Menu

    • Instagram
    • Pinterest
    • YouTube

Real Creative Real Organized

Creativity and Organization for Mom Life

  • Crafts
  • DIY
  • Organization
  • Travel
  • Mom Life
  • Holidays & Special Days
    • New Year’s
    • Valentine’s Day
    • Mother’s Day
    • Easter
    • Father’s Day
    • Fourth of July
    • Halloween
    • Thanksgiving
    • Christmas
    • Seasons
      • Spring
      • Summer
      • Fall
      • Winter
    • Olympics
    • Birthdays
  • Recipes
  • Shop
Home » Holidays & Special Days » Father's Day » Father’s Day Handmade Card (Tutorial)

Father’s Day Handmade Card (Tutorial)

June 11, 2012 by KC Coake 20 Comments

Share away! 😍

  • WhatsApp
  • Email
  • Facebook

First, let me take a moment to say Happy Father’s Day to all the dads out there. You are such an important part of your child’s life. Thanks for all you do.

To my Dad, thanks for all the memories, love, and support. The softball, ice cream, goals, late nights helping me get a paper printed back in the dark ages of computers/printers (remember doing that at your office with the Compaq computer?!). Now in modern times lunch at In-N-Out and playing Foursquare with you while living across the country. I love you!

Now, if you are my Husband, Dad, or Father-in-Law, put down the computer! Walk away! Your card is on its way to you and I don’t want to ruin the surprise. If you’re not family and you need gift ideas for this Father’s day, I’ve got a great list of over 15 ideas.

Here is the card I made for all the Fathers in my immediate family:

You can see above, the supplies you will need in order to complete this card. You will also need a corner rounder and some form of adhesive. I have found that the Scotch ATG Advanced Tape Glider with 2 Rolls of Tape/Kit(affiliate link) works really well and is a good value for the money when making cards. The initial price for the adhesive ‘gun’ kind of stinks,(although the link above is to Amazon, which is the best price I have found. It is even better than a 50% off coupon) but you get so much adhesive on one roll that it is worth it in the end and the adhesive works really well.
First, use your corner rounder to round the corners of your card base. I just use pre-made card bases I bought on sale at Michael’s. They are a nice thickness and come with envelopes, which works well and is easy for me.
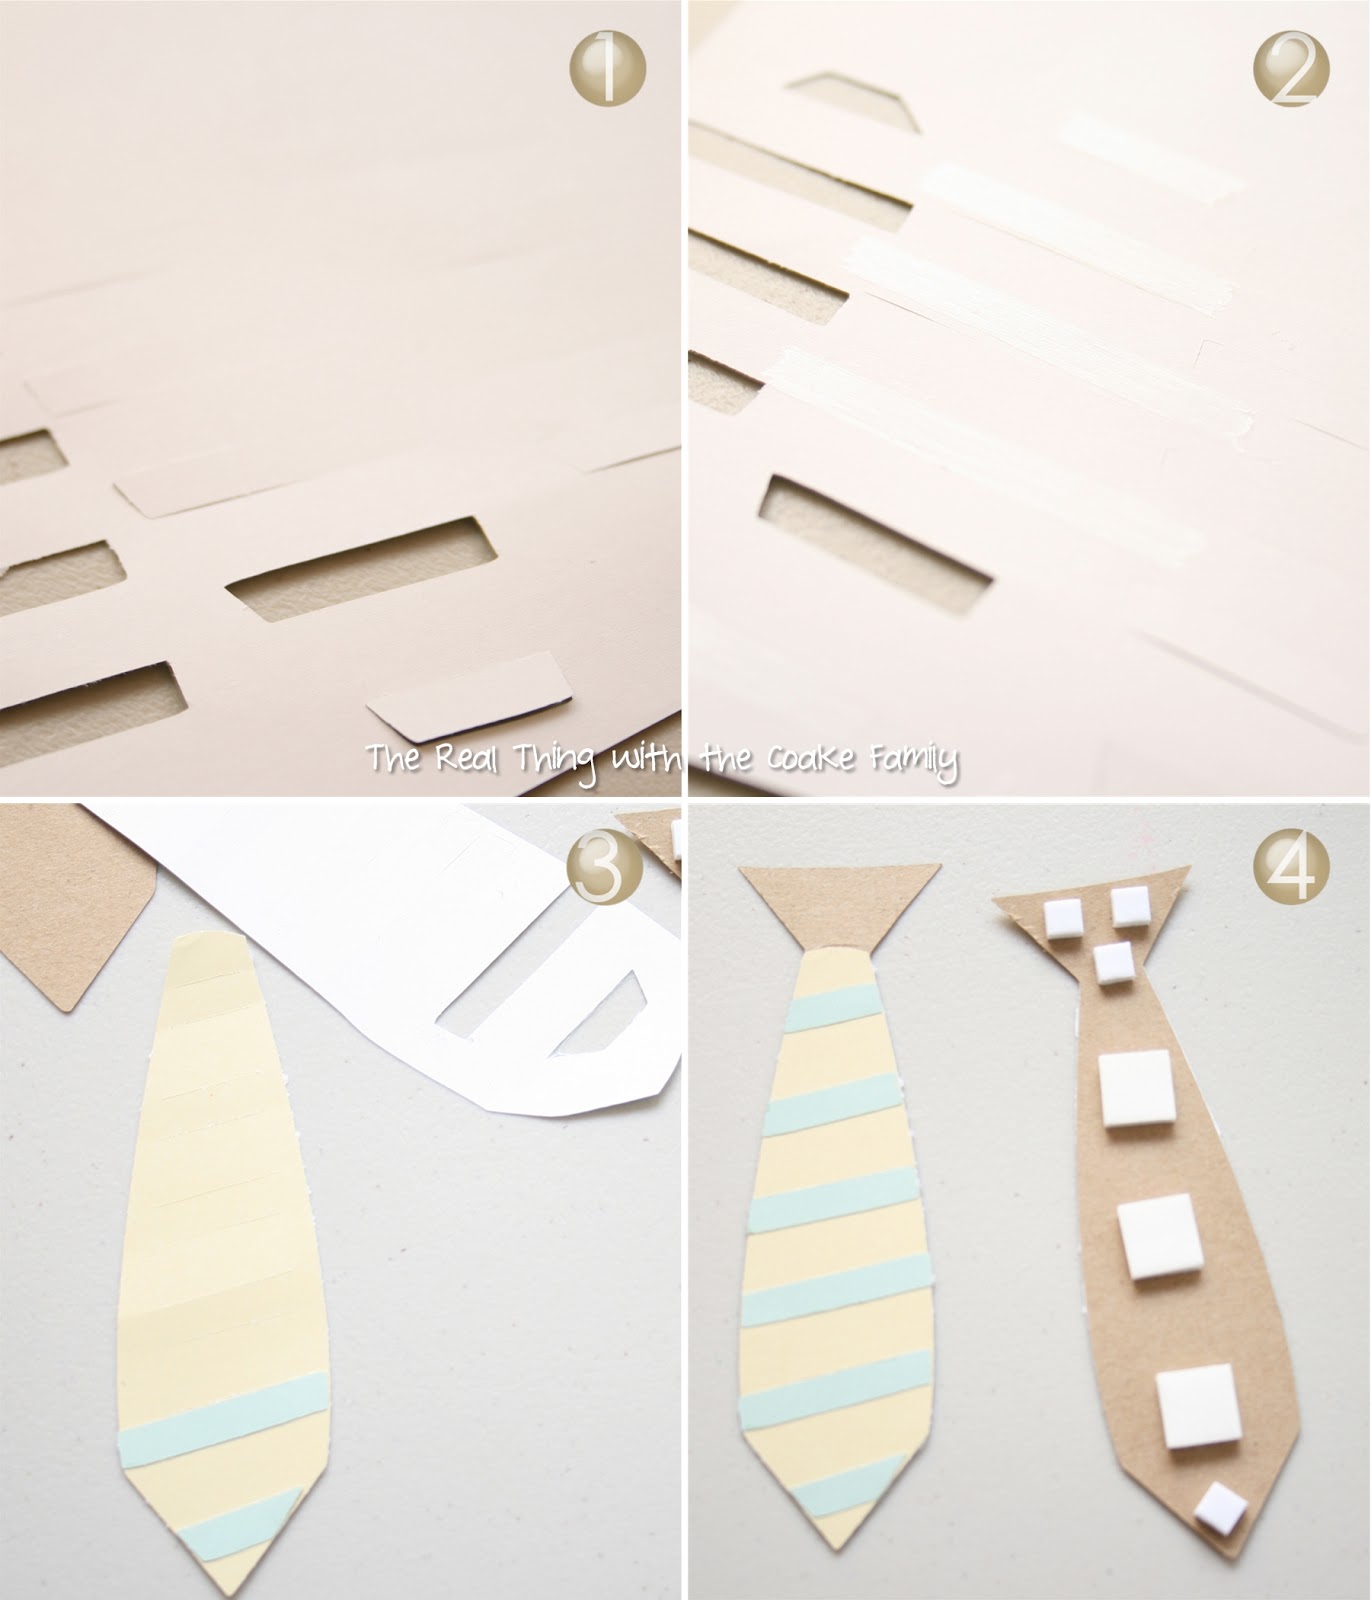
  1. Round the corners of your base print paper.
  2. Round 1 corner on each of your narrow pieces of solid paper.
  3. Adhere the narrow pieces to the print paper and the whole thing to your card base.
Use your Cricut and the Wrap it up Cartridge(affiliate link) to cut out the tie and coordinating pieces. Use the Wild Card Cartridge(affiliate link) to cut out the box, decorative border for your box, and ‘Happy Father’s Day’ title.
These pictures show a handy tip for working with smaller pieces cut out by the Cricut.
1. After your Cricut(affiliate link) cuts out the stripes for the tie, try to keep them together as you peel the paper from the sticky mat. I was lucky and was able to get all but 1 stripe to come off together.
2. Put your adhesive on the back of your tie stripes.
3. Remove the stripe with the adhesive and place it on the tie.
4. Add foam adhesive squares(affiliate link) to the back of your tie to make it ‘pop.’
It is really easy to make the decorative square I used on the inside of the card. Just thought since I had pictures of everything, I would include these as well.
ANOTHER HANDY TIP!!
1.  To adhere the wording, I could have used a liquid adhesive. I wasn’t feeling particularly patient, so I decided to just run my adhesive(affiliate link) across the back in 4 places.
2. This is what it will look like with the adhesive.
3.  Place the wording on the card where you want it to go.
4. Use your finger to rub off the excess adhesive. Can you see the little adhesive blobs?
5. Close up of the adhesive blobs. It comes right off if you gently rub it.
6. Looks great! Sort of took less patience, but patience was required to gently rub off all the extra adhesive. I am not sure it was really any better, but it was better to me that day. I think it will more permanently adhere to the card than the liquid glue.
Outside and inside of the card.
Happy Father’s Day!

More to Enjoy! 😍

Personalized Beer Glasses {Homemade Gifts}

Homemade Christmas Gifts ~ Etched Glass Pans

Share away! 😍

  • WhatsApp
  • Email
  • Facebook

Hi! I'm KC. I'm a single mom of 2 girls who loves all things creative. Whether it's making something crafty or tackling that DIY project, I'm gonna have some fun and stay organized in the process. 😊 Read More…

Follow Me:

  • Instagram
  • Pinterest
  • YouTube
Previous Post: « Teacher and Girl Scout Leader Gifts (Free Printable)
Next Post: Arizona Road Racers Summer Series 5k »

Reader Interactions

Comments

  1. K Coake says

    July 18, 2012 at 9:38 pm

    @Sarah Hamer Thank you!

    Reply
  2. K Coake says

    July 18, 2012 at 9:38 pm

    @Darby Hawley Thank you so much! It is so easy and I agree it looks impressive. Win, win, right?!

    Reply
  3. Sarah Hamer says

    July 18, 2012 at 9:38 pm

    Such an adorable Father’s Day card! 🙂 Great tutorial too!

    Reply
  4. Darby Hawley says

    July 18, 2012 at 9:39 pm

    This is so very impressive! What a great card!
    Stopping by from the It’s Overflowing Party 🙂

    Reply
  5. K Coake says

    July 18, 2012 at 9:39 pm

    Thank you! Thanks for featuring it on your fb page!

    Reply
  6. K Coake says

    July 18, 2012 at 9:39 pm

    Thanks so much! Thanks for the feature as well!

    Reply
  7. Bonnie and trish @ uncommon says

    July 18, 2012 at 9:39 pm

    fabulous card and tutorial! Thank you for sharing at Uncommon! featuring this on our FB page tonight! 🙂

    Reply
  8. Desiree says

    July 18, 2012 at 9:39 pm

    Awesome idea! Featuring it tomorrow on my blog… Thank youso much for sharing it!

    Reply
  9. K Coake says

    July 18, 2012 at 9:39 pm

    Thank you!

    Reply
  10. CyndiS says

    July 18, 2012 at 9:39 pm

    You did a great job.  I love it.

    Reply
  11. K Coake says

    July 18, 2012 at 9:39 pm

    If I had an extra one already done…I totally would do that for you. But alas I don’t and the non-stop last month has caught up to me….I’m exhausted. Maybe next week there will actually be time for a break. Here’s hoping. You had any chance to relax after your super long trip? Or do you not really need that?

    Reply
  12. K Coake says

    July 18, 2012 at 9:39 pm

    Thank you so much! I don’t have time to link up more tonight, but I will try to remember to link up tomorrow. Thanks for the reminder and invite! 😉

    Reply
  13. K Coake says

    July 18, 2012 at 9:39 pm

    Thanks so much! I enjoyed looking at your Father’s Day Card as well. Have a great night!

    Reply
  14. Carol says

    July 18, 2012 at 9:39 pm

    What a great card and tutorial! I came over from Tip Junkie where I linked up a Father’s Day Card right after you 🙂 

    Reply
  15. K Coake says

    July 18, 2012 at 9:39 pm

    Thank you so much! I hope my Dad didn’t peak…I told him not to. Oh well, even if he did peak, it will still be fun to get it in the mail. Thanks for your sweet comments.

    Reply
  16. Erika says

    July 18, 2012 at 9:39 pm

    What a gorgeous card, and a great tutorial, it looks wonderful… thank you for sharing, it is really inspiring and Dad will be very surprised. 

    Reply
  17. Kristine Toone says

    July 18, 2012 at 9:39 pm

    Cute!  Want to craft me one and mail it to my Dad? 🙂  Hehe… just kidding!

    Reply
  18. Christine Cook says

    July 18, 2012 at 9:39 pm

    WOW!!!  This is a wonderful card!!  Such a great tutorial!!!

    Oh and you better be planning on sharing this at The DIY Dreamer… From Dream To Reality!!!  Please 🙂

    Reply
  19. marion waters says

    January 19, 2015 at 10:10 pm

    Great card. I am past the time of complicated cards. I am 78 years of age and still love to make cards. I have to make a male card and love this one, I will be keeping in touch and looking forward to your next card and especially your tutorials.

    Bye for now,

    Marion.

    Sunshine, Melbourne, Victoria

    Reply
    • KC Coake says

      January 21, 2015 at 5:13 pm

      Thanks so much! Glad you like what I made.

      Reply

Leave a Reply Cancel reply

Your email address will not be published. Required fields are marked *

Primary Sidebar

Meet KC

Hi! I'm KC, Welcome to my blog!
Click here to Learn More About Me…

Let’s Be Social

  • Instagram
  • Pinterest
  • YouTube

Copyright © 2025 · Sprinkle Pro Theme on Genesis Framework · WordPress · Log in