Today I am excited to share with you the recipe for one of my favorite Christmas activities – making gingerbread houses. My family and I have been making these log cabin style gingerbread houses since 1976. You can read more about that here: Best Family Christmas Activities to Make Gingerbread Houses.
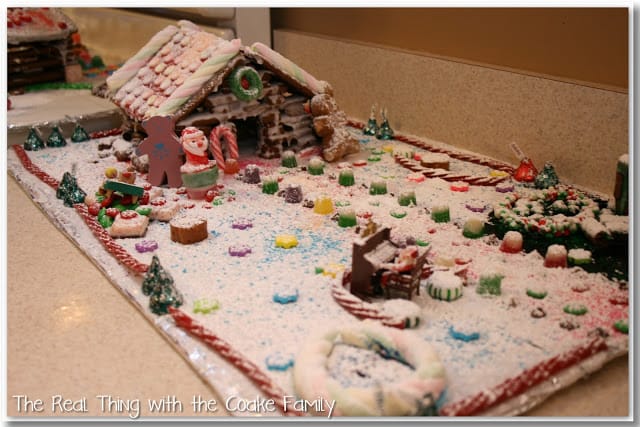
First, let me show you our house we made this past weekend. We got together with most of our East Coast family. This year we made 4 houses. Lots and lots of candy was eaten. Thank goodness my Aunt brought some healthy snacks too or we may have gone into a sugar coma. lol!
Next, I’m going to show you a pictorial of how to put your own house together. At the bottom of the post, I’ve got the recipe as well as written directions that you can print out. I just think seeing it in picture form is easier than just reading how to put them together.
The thing I want to say though is that I put my house together slightly ‘wrong’ in the picture. It really doesn’t matter. That is the main thing I want you to remember if you decide to make these houses with your family. Have fun! Don’t sweat if they are put together ‘perfect.’ It really doesn’t matter. Fun will be had, memories will be made and a tradition started. No one will care whether the house was put together just so.
Once you make your gingerbread dough and chill it for at least 2 hours, you will need to cut out the logs. We roll our dough out on my kitchen counter and use a pizza cutter. Just plop your template down on the dough and wheel away with your pizza cutter. It makes it so much faster!
I have a printable for you of the sizes for the logs. Cut them out of cardboard so they will last for you to use them on the gingerbread dough as well as year after year.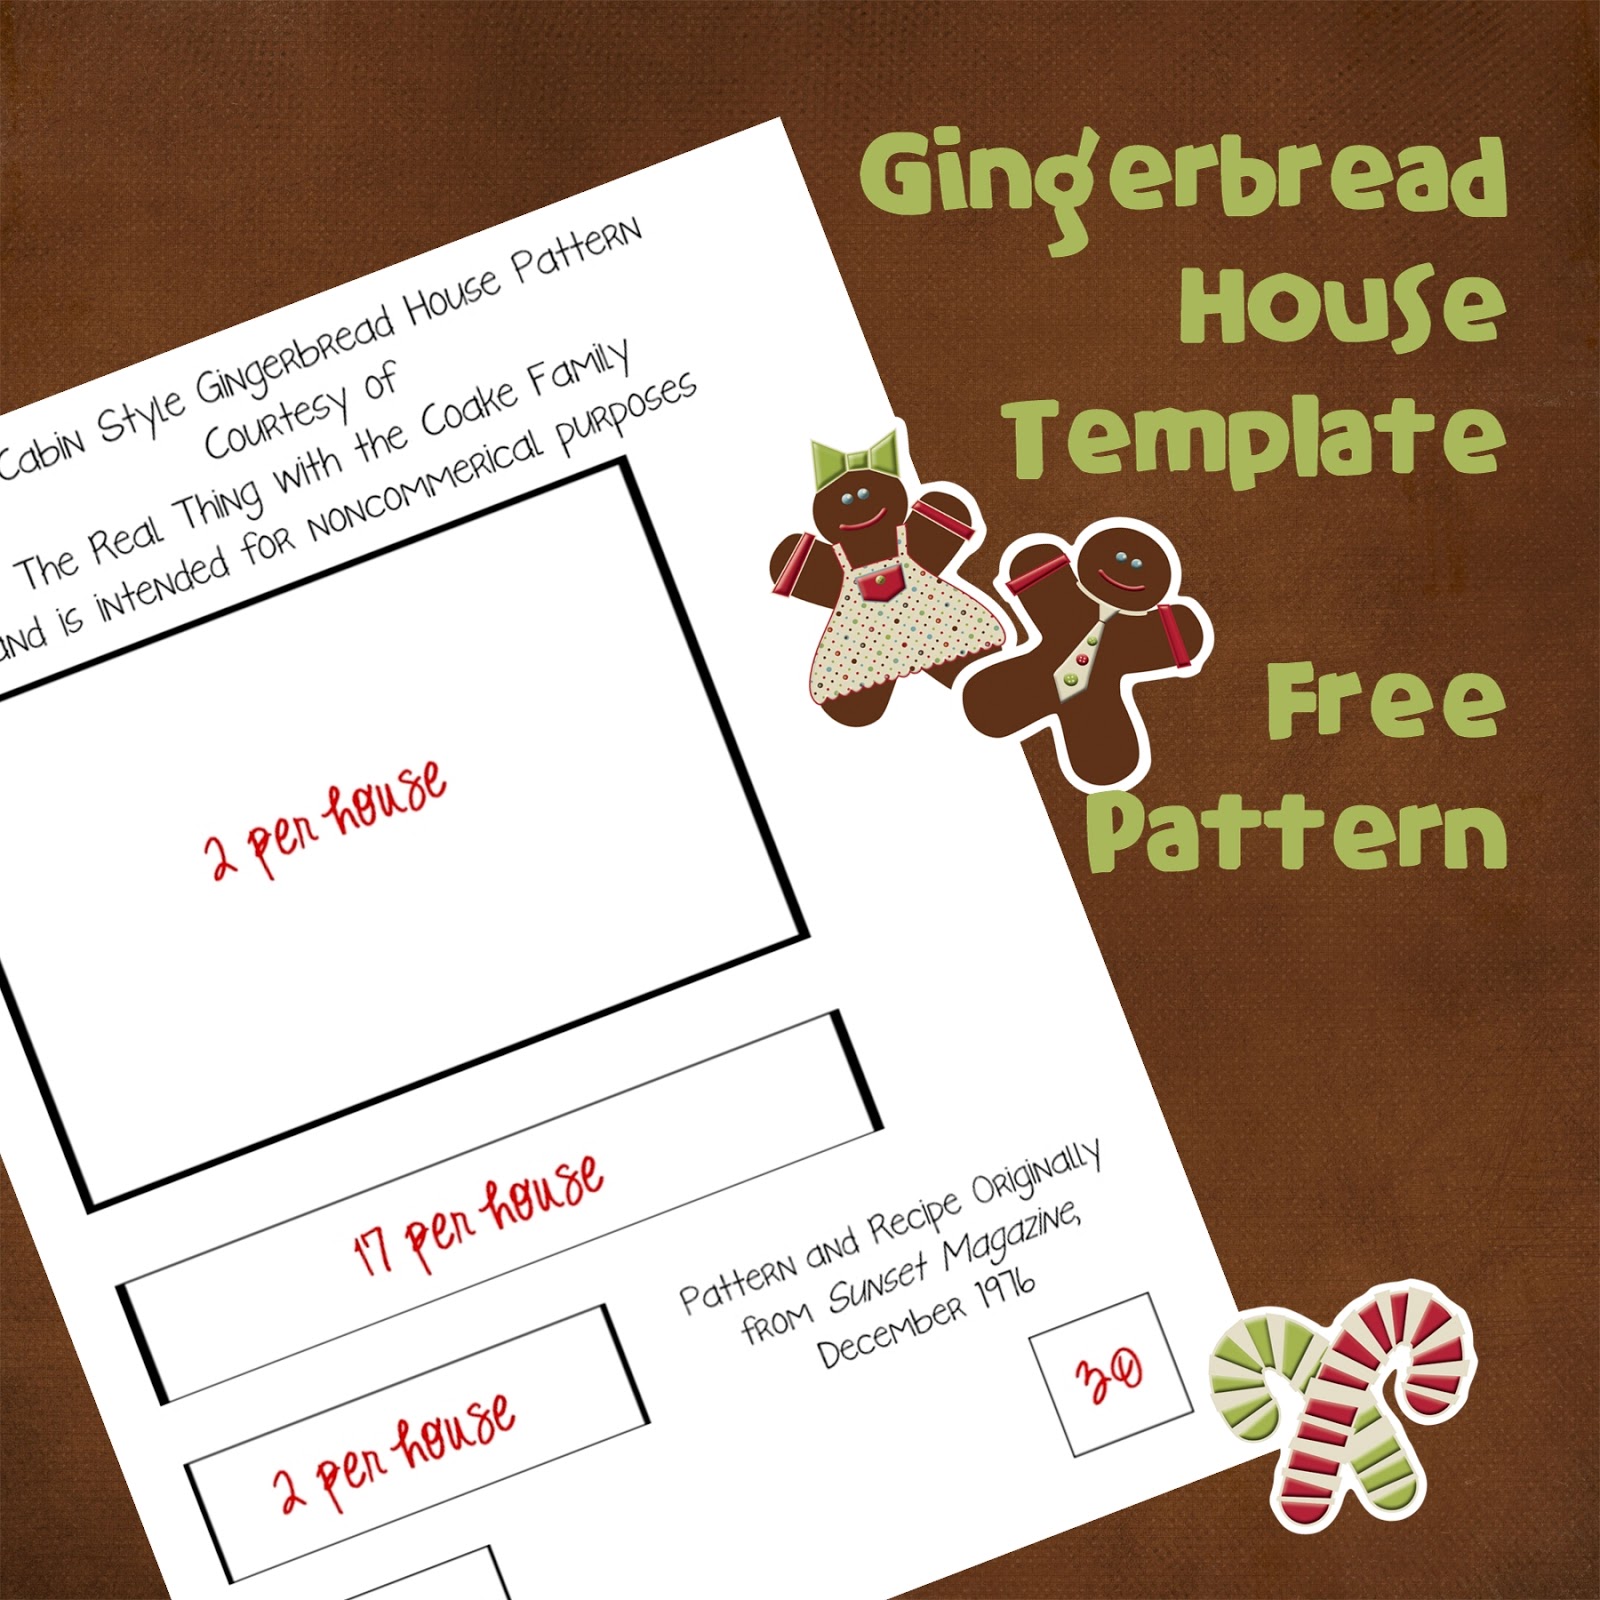
Pattern Download
Once you have baked all your gingerbread pieces (make sure to make extras), if you are making more than one house, it works really well to put all the pieces for one house together in a container or zipper bag. I find it easier to do this in advance rather than once everyone has started to arrive.
We usually build our houses on cardboard covered with heavy duty aluminum foil. Just keep your eye out for big boxes in November and December and you are set!
Start building, you will use your ‘glue’ or confectioner’s sugar mixed with water and use 2-2″ pieces in the front with a 6″ piece in the back(above: top left picture). We always add spacers under the 6″ logs as we build up, but the directions and the number of pieces listed in the recipe do not include using spacers this way. Add spacers and a 6″ log to each side of the house (above: top right picture). Continue building this way adding logs and spacers (above: bottom picture).

At the 4th layer of logs, you will add a 6″ log above your doorway. This is where I completed this house incorrectly and didn’t realize it until it was too late…oops! Add another layer of 6″ logs all the way around. Then add 2 more 6″ logs on the sides of the house. Continue building the gables, as shown below, to support the roof.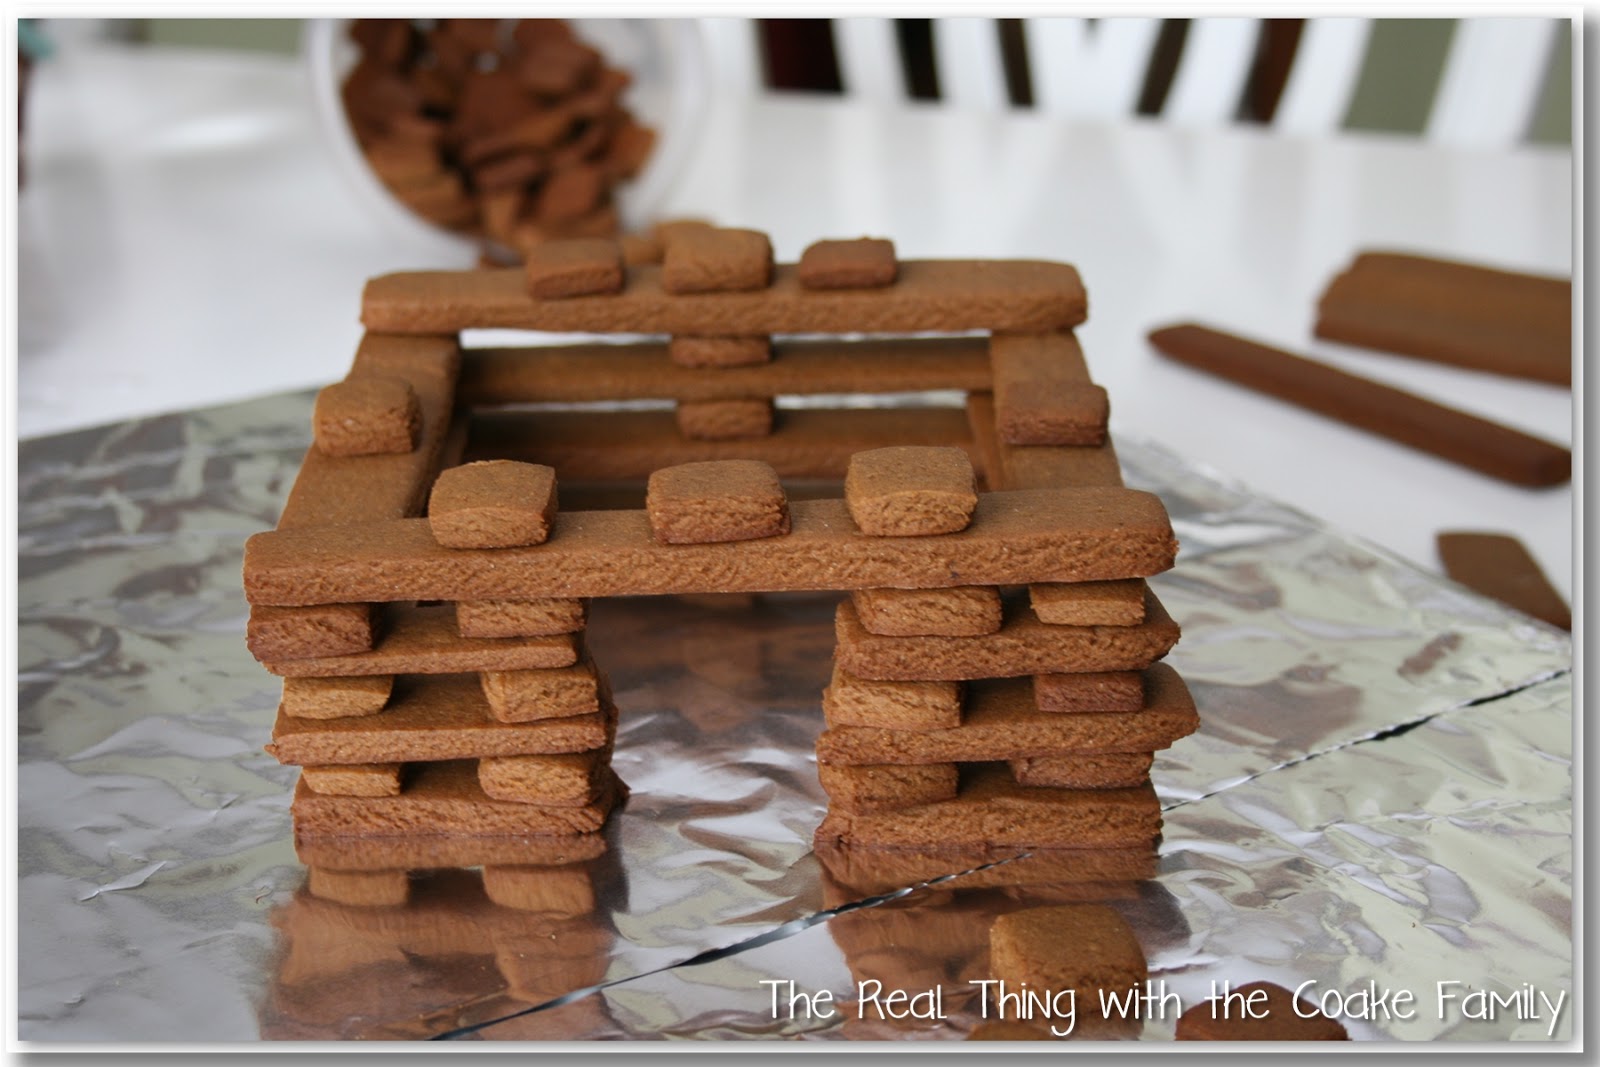
To support your roof, you will want to have a 2nd layer of logs (not pictured) as well as two logs on the sides of the house(not pictured). Add 3 spacers to the logs at the front and back of your house.
Use your 2-3.5″ logs on top of the 3 spacers. Place 2 spacers on top of the 3.5″ log.
Place your final 2″ log on top of the 2 spacers. Use 2 spacers stacked on top of each other for the final pieces to support your roof.
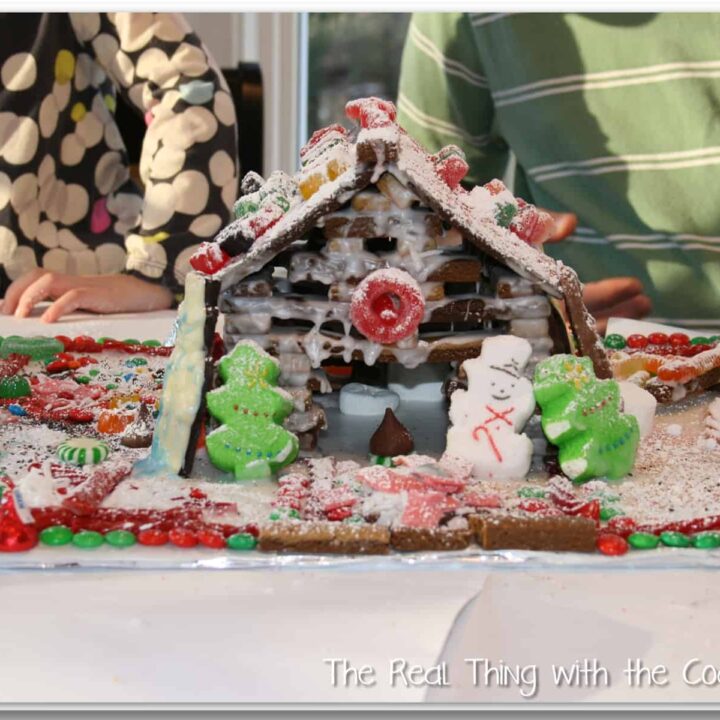
Use your ‘glue’ (confectioner’s sugar and water mixture) along with the two logs on the side of the house as well as on the ‘gables’ you just built. Place your roof on top. Put additional icing or ‘glue’ down the seam or center of the roof. Hold it in place for a few minutes. Voila! You just built a log cabin gingerbread house!
Now let your creativity and your sweet tooth be your guide as to how to decorate your house. Most of all have fun and cook extra pieces of everything…you will need them, whether in building the actual houses (cause they never go together just perfectly and it doesn’t matter) or for all the fun of decorating and being creative.
I hope you add this to your Christmas activities. I would love to hear about it if you make your own log cabin gingerbread house and I would love to see pictures!
Log Cabin Gingerbread Houses
Ingredients
- Cookies
- 3/4 cup sugar
- 3/4 cup shortening
- 3/4 cup molasses
- 1 teaspoon salt
- 1 teaspoon baking soda
- 1 teaspoon ground ginger
- 1/4 teaspoon ground nutmeg
- 1/4 teaspoon allspice
- 2 Tablespoons water
- 3 1/4 cups all purpose flour
- Icing
- 2 cups powdered sugar + additional for snow
- 1/4 cup water
Instructions
Thoroughly blend sugar and shortening. Add molasses, salt, baking soda, ginger, nutmeg and allspice. Add water and flour. Mix well. Chill until firm, about 2 hours.
With floured rolling pin, roll out 1/3 of dough on a floured board to 1/8 inch thick. Make 2 roof sections (4" x 6"). Gather scraps and roll out remaining dough to a generous 1/4 inch think. Cut out 8 logs 2" long, 2 logs 3 1/2" long, 17 logs 6" long, and 30 spacers, each 1/2" square. Use remaining dough to cut out additional shapes or extra logs/pieces. Arranging them 1" apart on lightly greased baking sheets. Place the two roof sections on a separate sheet.
Bake in a 350 degree oven for 12 to 15 minutes or just until firm to touch. As soon as roof is baked, lay pattern on each section and evenly trim one long edge (where two sections will meet). Cook cookies on wire racks. Package airtight or freeze.
Icing
Stir together the powdered sugar and water until smooth. You'll also need about 2 cups unsifted powdered sugar for snow.
Assembly
Paint icing on foil-covered base and sprinkle with sugar.
Use 6" logs for back and side; 2" logs for front.
Set square spacer logs near inner end of each 2" log, forming a doorway as you build up front. (We also use spacers in the center of each 6" log between the layers to support the log and keep it from sagging, but if you do this you will need more than 30 spacers per house.)
The fourth layer of logs uses 6" long pieces all around including over doorway.
Add fifth log to the back; set three spacers across doorway, Then add another 6" log across front.
Using spacers and 3 1/2" and 2" logs, build up gables on front and back of cabin.
Stack two spacers on front and back; add fifth log to each side. Ice and sugar roof; ice top logs. Set roof in place, trimmed edges together.
Notes
We usually use 2 pounds of powdered sugar per house for the icing and snow.
This recipe and instructions are from "Sunset Magazine" December 1976.
Thank you, Sunset for publishing such a fun article that started an amazing family tradition!
Recommended Products
As an Amazon Associate and member of other affiliate programs, I earn from qualifying purchases.

So cute! Looks fun to make. Thanks for the pattern.
Thanks! They are lots of fun to make. You are welcome for the pattern.
KC
that is so fun, I really think my son would get a kick out of making one.
It is so fun!
I bet making the cabin was a lot of fun. Happy holidays to you and your family.
It is a lot of fun! Happy holiday’s to you as well.
KC
I love the idea of a log cabin gingerbread house! It looks great! Thanks for the inspiration
Merry Christmas
Thank you! They are so fun putting together and so many great memories.
Merry Christmas to you as well.
KC
I love the look of the log house! I tried to create something similar to this with brownies for this firehouse idea I had for a Fireman themed party…but it turned out horribly wrong! I’d include the link here to show you but I’m too embarrassed! 🙂 I always have ideas that look beautiful in my mind and they come out so sloppy. I guess half the fun is learning though, right? 🙂
Thank you! We love the look of the log cabin as well. Yes, half the fun is in the creating and learning. Of course, we have been making these since 1976, so we have had lots of practice…kind of isn’t fair to compare with a first attempt at something without a pattern and such. 😉
Take care,
KC
Wow, I remember making these with our playgroup! So much fun and wonderful memories! I was thinking of trying it again this year…
You are right! Such great memories! We were just talking about this with my parents…they were pleased to know that some of our friends have also started the tradition.
Take care,
KC
Our family has been making this recipe project since the 70s. Thanks for capturing this in your blog as a digital reference. Our repeated photo copies over the years have blurred a few details while magnifying a few cracks and crinkles in the pages. Easy to make. Our version is a bit messy looking that gives it a more snowy, hand crafted look. I placed a single long log on top to cover the crack on the roof that naturally would block the elements. It firms up the anchor of the roof by joining them with the frosting and the top cross piece. An extension under the roof in the front opening provides a place to hang a miniature wreath made of the mini live trees on a steel 16 gauge ring
Samantha, Thanks so much for sharing your tips! I feel like there are endless possiblities on how to make these houses. They are fun to make!
Take care,
KC